Are you considering installing Debian 12 on a virtual machine using Oracle VM VirtualBox 7? Don’t look elsewhere because I have prepared a comprehensive guide with all the details for you!
With this comprehensive guide, you will be able to create a virtual machine that can run Debian 12 efficiently. At the same time, you will gain not only performance but also full VM functionality by adjusting the settings correctly. If you are new to exploring the Debian operating system in a virtual environment, let’s start using the accessible method VirtualBox!
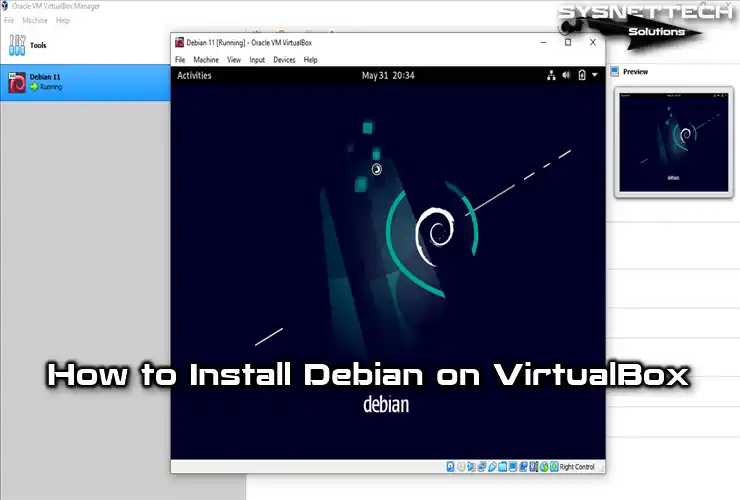
How to Set Up Debian 11 on a Virtual Machine using Oracle VM VirtualBox 6.1.34
Debian is a unique operating system that uses either the Linux or FreeBSD kernel. It is a leading open-source project granting users access to 59,000 applications.
After the base version of the Debian 11 distribution was released on August 14, 2021, the updated version 11.3 was released on March 26, 2022.
There are two ways to utilize this Linux operating system. You can either directly install it onto your computer or opt for virtualization programs to install and use it virtually. This means you can start utilizing the Linux distribution without getting rid of or restarting any other systems already installed on your PC.
Using Debian in a virtual machine is recommended for entry-level Linux users. After installing a clean system on their computers, users can create snapshot backups and quickly get back their systems that crashed due to a faulty code or software later on.
How to Create a New Virtual Machine for Debian
When you choose to use the Debian Linux operating system via a VM on your host, you must configure its settings correctly. If you do not configure some settings of virtual hardware correctly, you may affect the performance and system stability of the VM.
Step 1
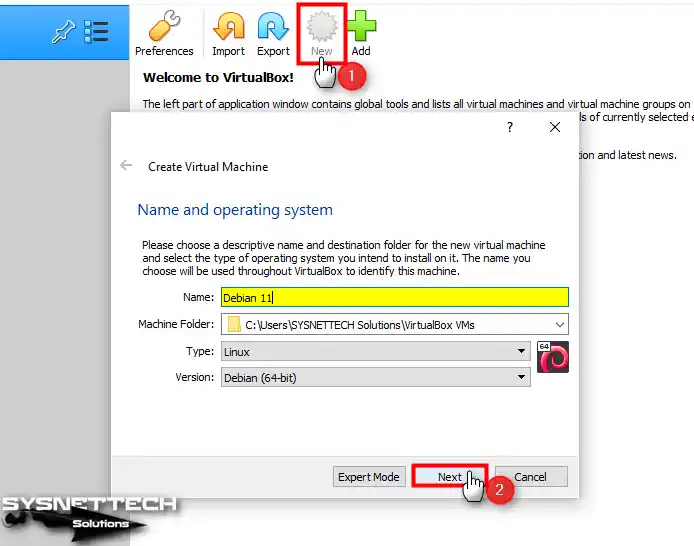
After installing the Oracle VirtualBox software on your host computer, run it, and when the program opens, click the New button from the options on the main screen and start the virtual machine creation wizard.
When you type the system’s name, you will install it in the Name and Operating System window, and the Type and Version fields will be automatically configured by VirtualBox. If the system settings you will install cannot be determined at this stage, you must select it manually.
Suppose you opt to install the Debian system’s 32-bit or 64-bit versions. In that case, check that this architecture type is set correctly in the version section.
After selecting the architecture type of the Debian system and configuring the location to be installed, click Next.
Step 2
In the Memory Size window, configure an appropriate virtual memory size for the virtual machine according to the RAM capacity of your host PC.
For Debian, a minimum memory size of 4 GB or 8 GB may be sufficient. Still, you can increase this value according to your work on your guest system and the programs you will use.

Step 3
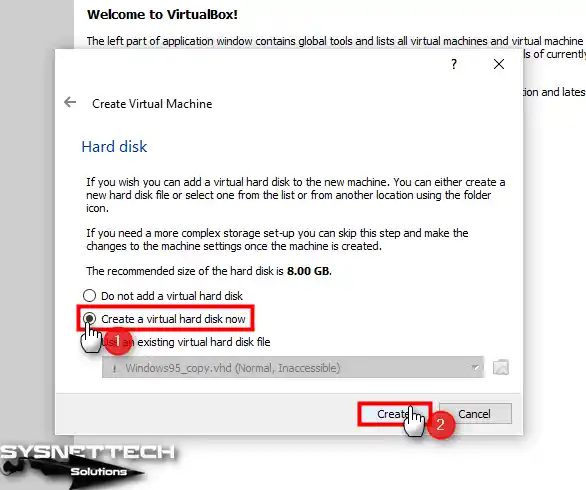
You must create a new virtual disk since you will install a Debian from scratch in the Hard Disk configuration window. If you have a VM installed before, you can add the VDI virtual disk file from this window.
Step 4
If you will not use the virtual machine you prepared later with other virtualization programs, select the VDI (VirtualBox Disk Image) disk type recommended by Oracle and click Next.

Step 5
You can dynamically or permanently store the VM on your host’s physical storage device. When you choose Fixed Size, space will be allocated from your host disk as much as the size of the virtual disk.
Suppose you are using an SSD or NVMe disk. In that case, choosing the Dynamically Allocated storage method is helpful, as there will be no performance loss.

Step 6
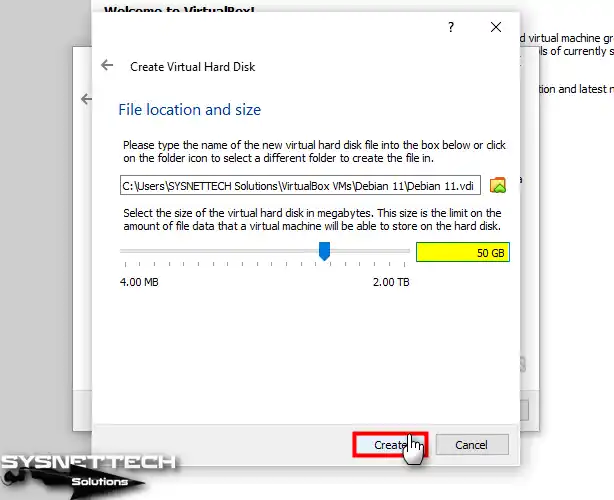
Leave the location of the virtual machine disk file at the default and choose a suitable disk size according to the work you will do on the guest machine.
Step 7
After preparing the Debian VM, click Settings from the tool menu to make more advanced settings.
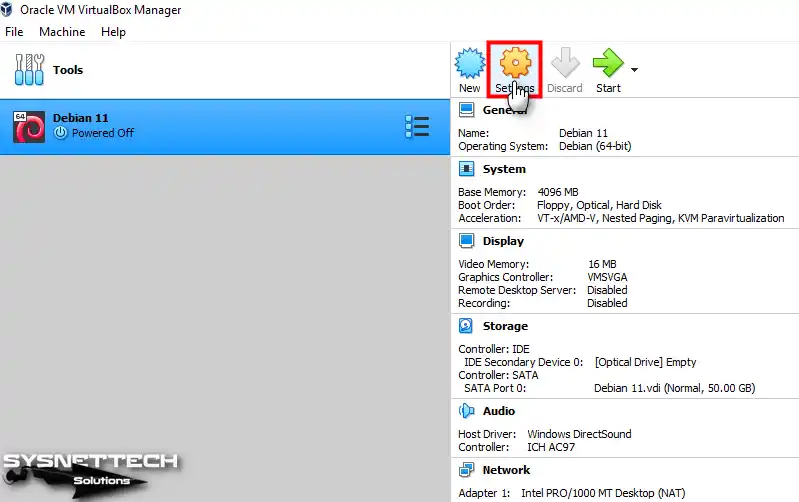
Step 8
In General / Advanced virtual hardware settings, change Shared Clipboard and Drag and Drop properties to Bidirectional to transfer files or copy text from the host machine to the VM.

Step 9
Disable Floppy from the devices in the Boot Order section of the System / Motherboard settings and set Optical to the preliminary order.

Step 10
Open the settings of the Processor’s virtual hardware and increase the number of virtual processors according to the capacity of your host CPU. For optimal system stability, allocating a minimum of 2 or 4 virtual processor cores is recommended.

Step 11
Open Display / Screen device settings and enable 3D Acceleration for a better graphics experience in the virtual machine. Next, set your virtual system’s graphics memory to 128 MB or higher.

Step 12
Select IDE Controller from Storage settings and delete it.

Step 13
To add a SATA optical drive, click the icon next to the SATA Controller and click the Leave Empty button in the Optical Disk Selector window.

Step 14
Select SATA Controller and enable Host I/O Cache from Attributes for virtual PC performance.
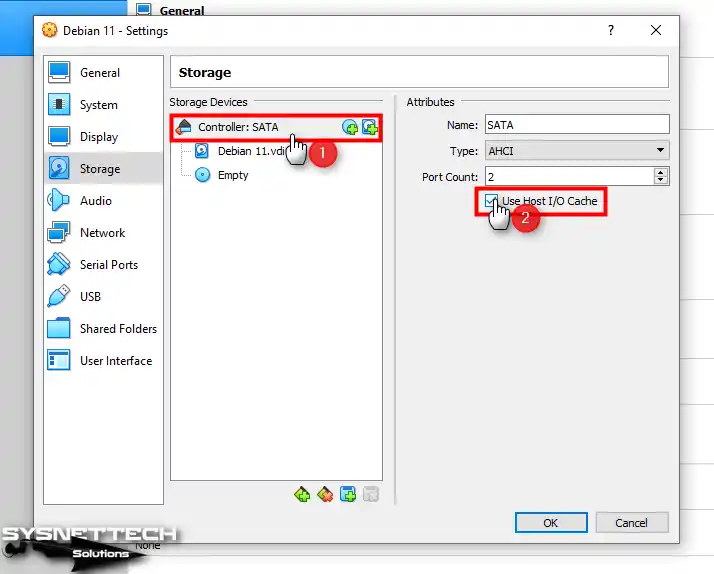
Step 15
Select the Debian 11.vdi virtual disk file and enable the Solid-State Drive (SSD) feature to improve disk performance.

Step 16
To add a Debian 11 ISO file to the virtual PC, select the Empty disk drive, then click the CD/DVD icon and click Choose a disk file from the options that appear.

Step 17
Visit the link here, select the Debian 11 ISO file you downloaded to your host computer, and open it.
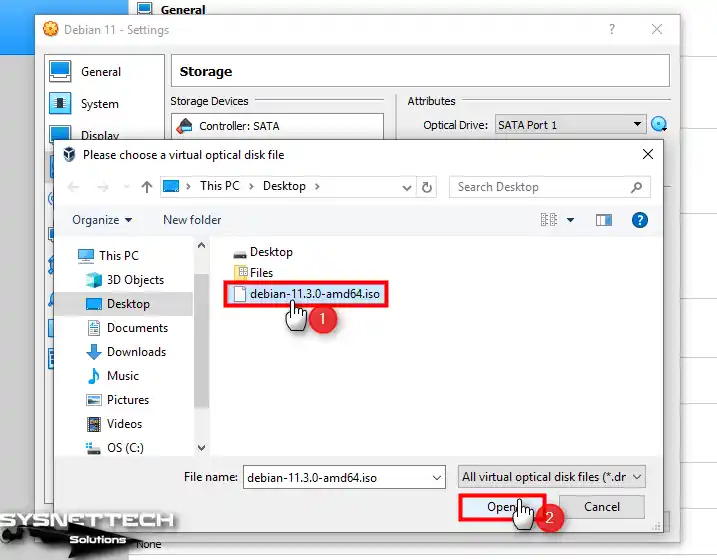
Step 18
Finally, select the USB 3.0 (xHCI) Controller type and close the settings of the virtual computer to transfer files faster using your USB 3.x devices in your virtual system or quickly back up your documents with big file sizes.

Step 19
After correctly setting the Debian 12 virtual computer’s settings, click Start from the tool menu.
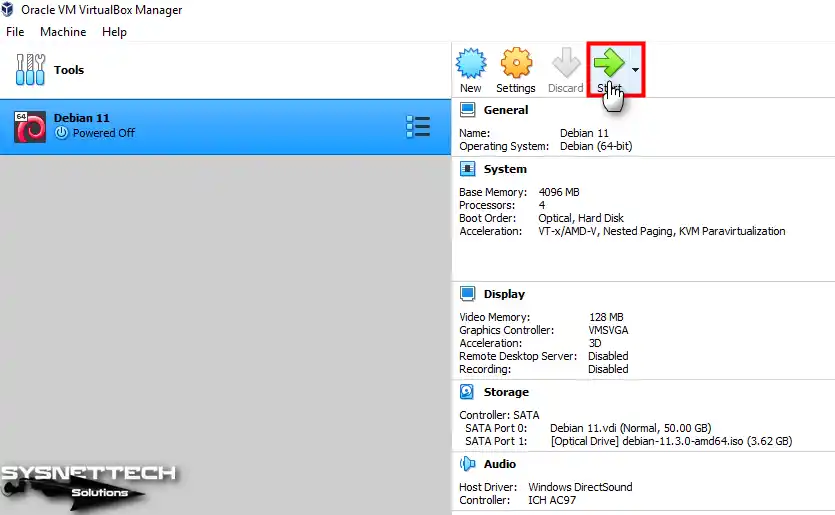
How to Install Debian 12 in VirtualBox
After preparing and running the Debian guest system, you can start the system setup and install it virtually on your host PC.
Step 1
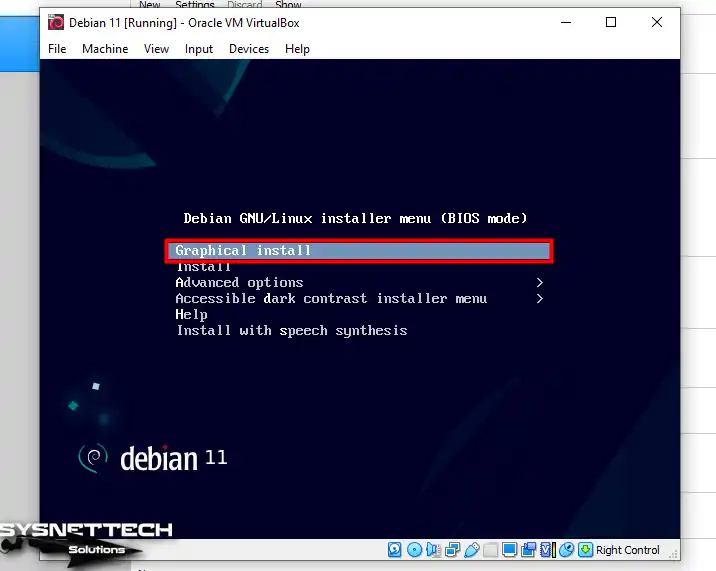
After running your Debian virtual PC, you will see the Installer Menu as in the image below. On this screen, press Enter in the Graphical Install option and continue.
Step 2
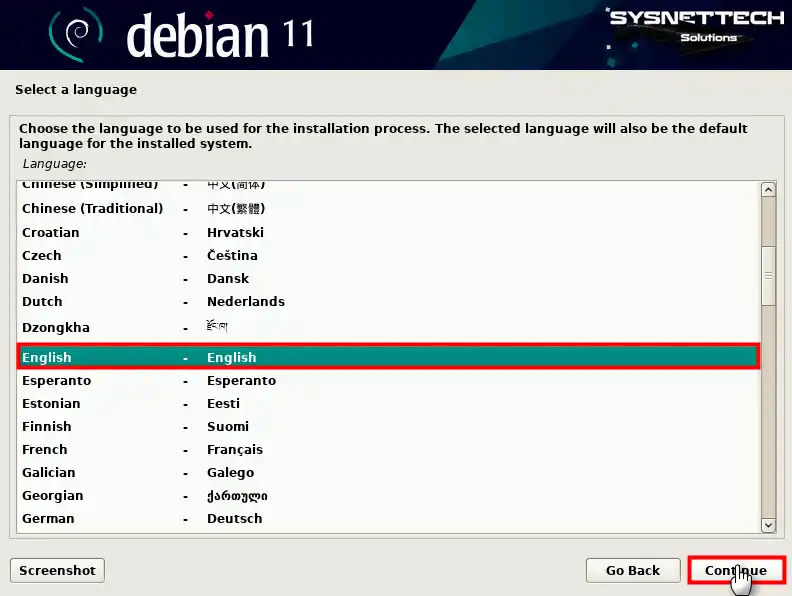
Select the language of your Linux virtual system and click the Continue button.
Step 3
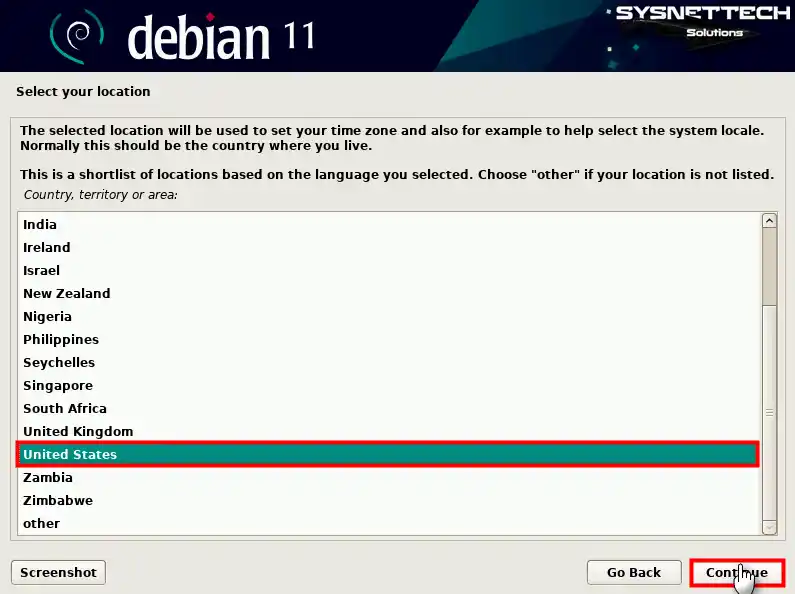
Kindly choose your region and proceed by clicking the “Continue” button.
Step 4
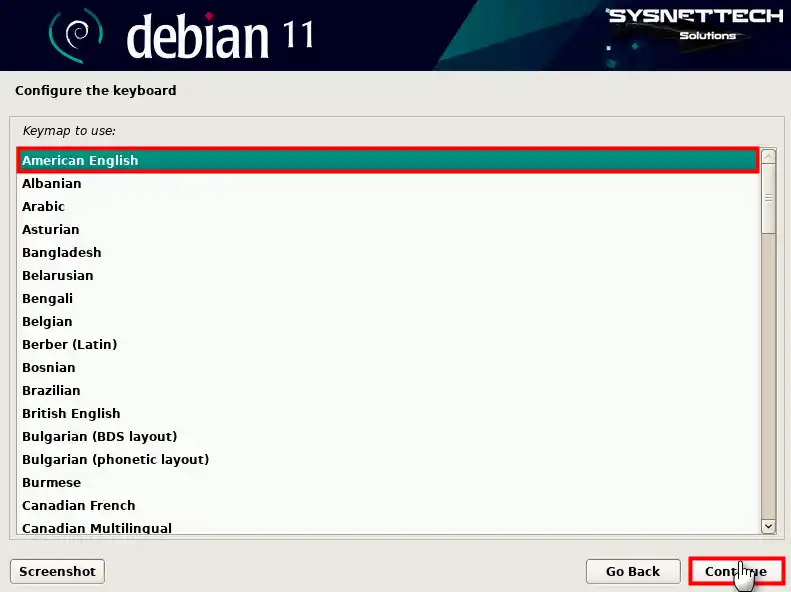
Select your keyboard layout for the Debian guest operating system and click Continue.
Step 5
Type a unique hostname that identifies your virtual PC in your network environment and continue.

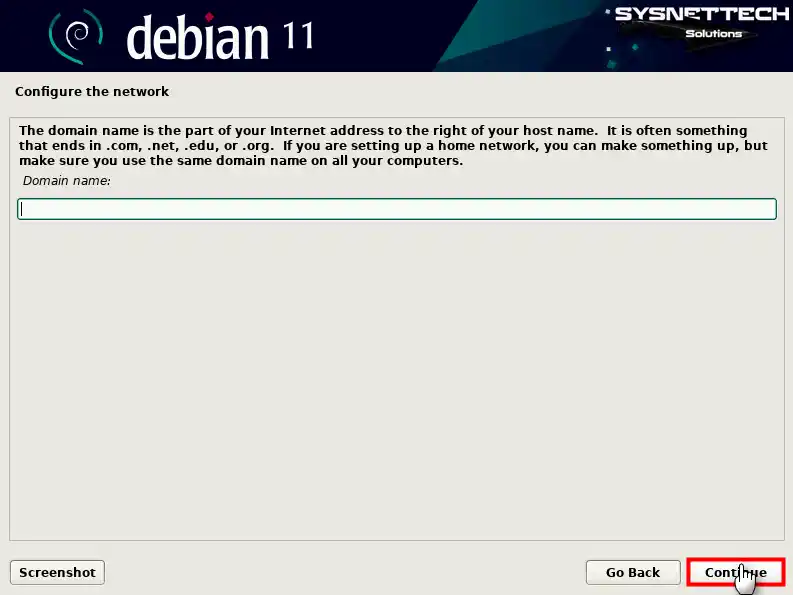
Step 6
If there is no Active Directory server in the environment where you use your VM, leave the domain name blank.
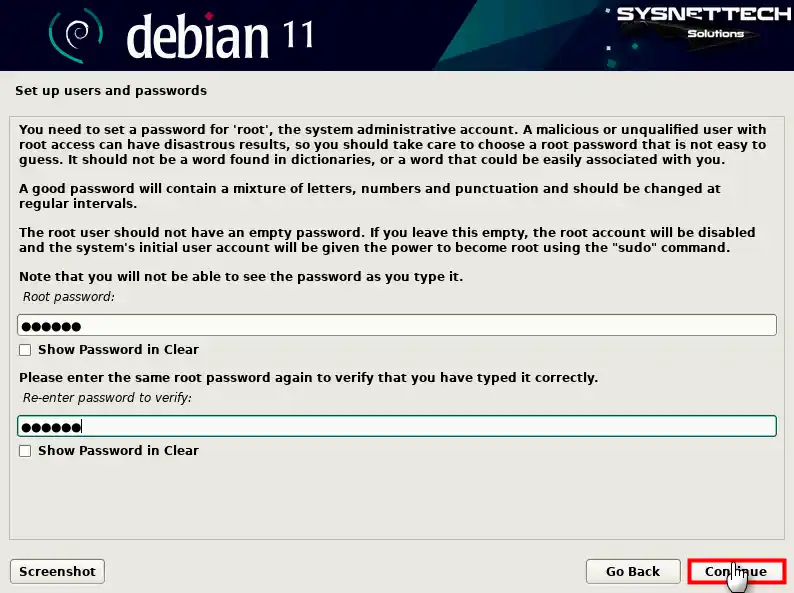
Step 7
Create a strong root password to prevent unauthorized users from damaging your Linux system.
Step 8
A typical user account is used instead of the root account for non-administrative activities. Type your full name for the local user account and click Continue.

Step 9
Your user account name is set because it contains your first name, but you can change it. After ensuring your username is typed in lowercase letters, click Continue.

Step 10
For optimal security, generating a strong password that incorporates a mix of lowercase and uppercase letters and numerical characters is crucial.

Step 11
Select your time zone and click Continue to display your system time correctly.

Step 12
Select the Guided – use the entire disk option from the disk configuration options and continue.

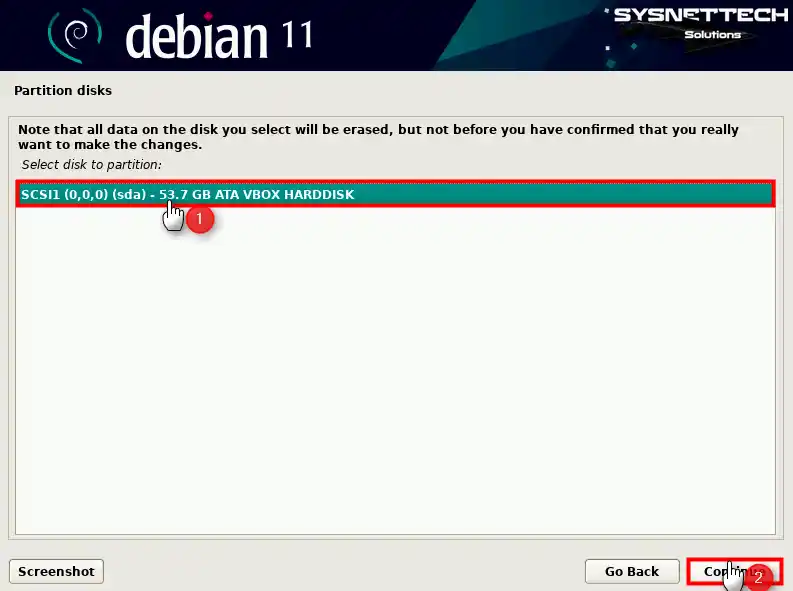
Step 13
Select the VBOX HARDDISK virtual disk for partition configuration.
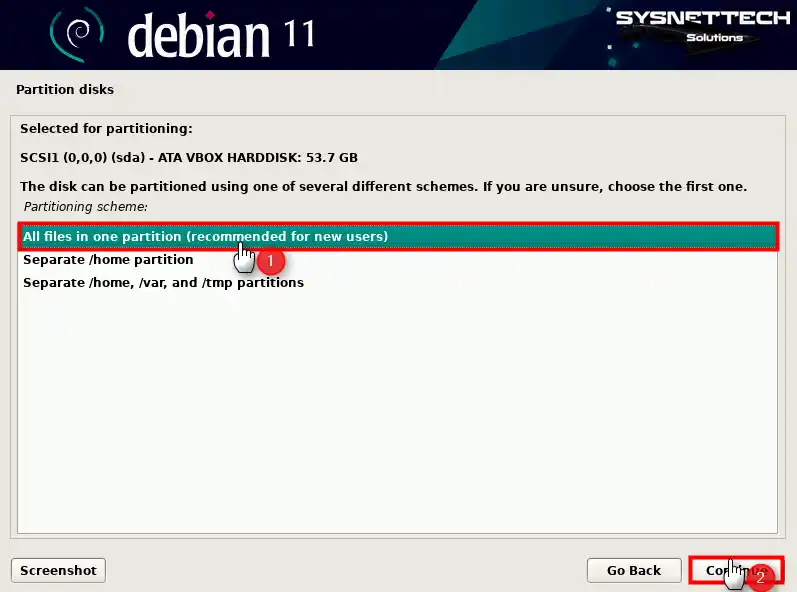
Step 14
You can install the system using different disk schemes, or if you need more clarification, you can choose the first option, All files in one partition.
Step 15
To complete the disk configuration, select Finish partitioning, write changes to the disk, and click Continue.

Step 16
After checking the operations on the disk, select Yes to approve the changes to the disk.

Step 17
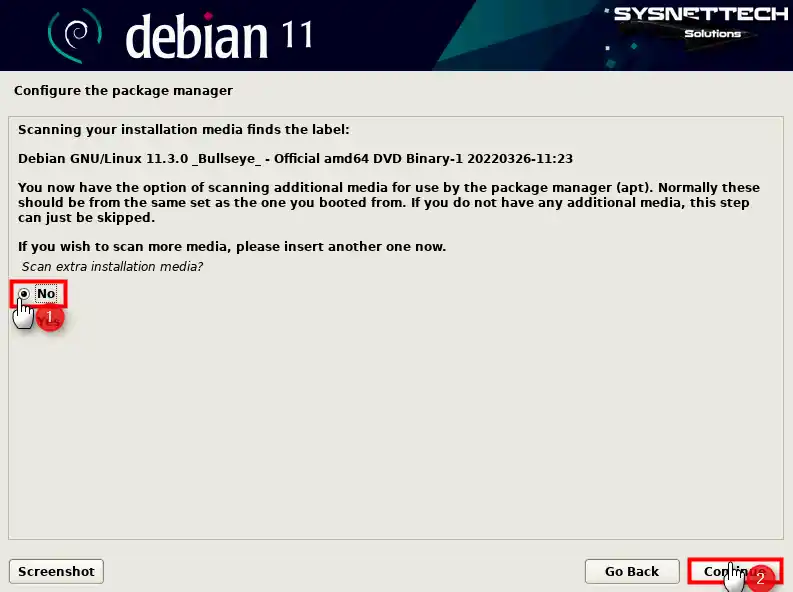
If you do not have any other installation media and want to continue without scanning a different media, continue with the No option.
Step 18
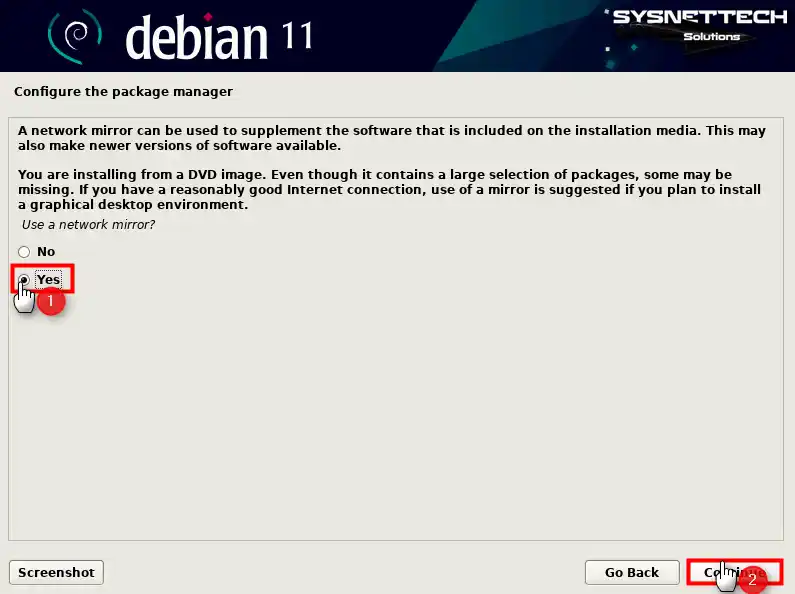
When you want to download a program from the Internet after installing the system from a DVD image, the current addresses must be defined in the repository list. Therefore, select Yes to add a network mirror and click Continue.
Step 19
Select your location or the country closest to you for the Debian archive mirror.

Step 20
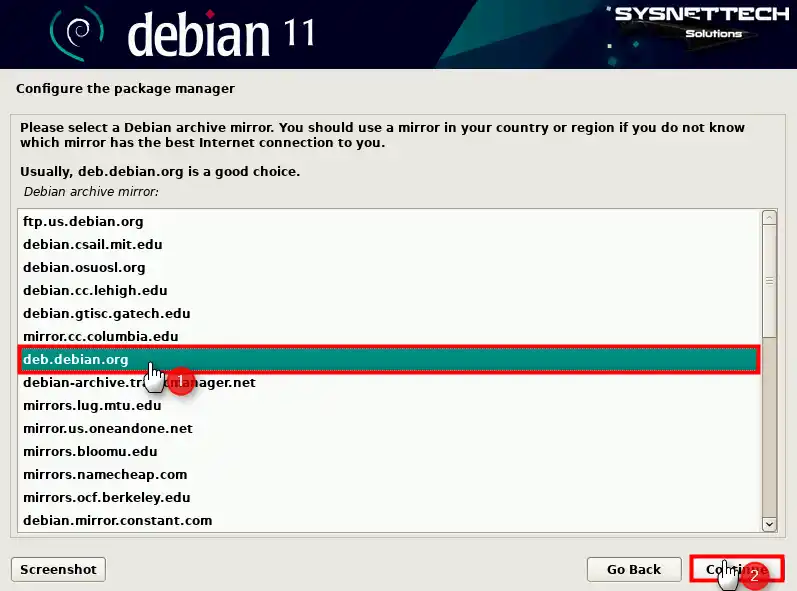
For the Debian archive mirror, continue with the suggestions from deb.debian.org.
Step 21
Leave the suitable option blank if you do not want to configure a proxy address.

Step 22
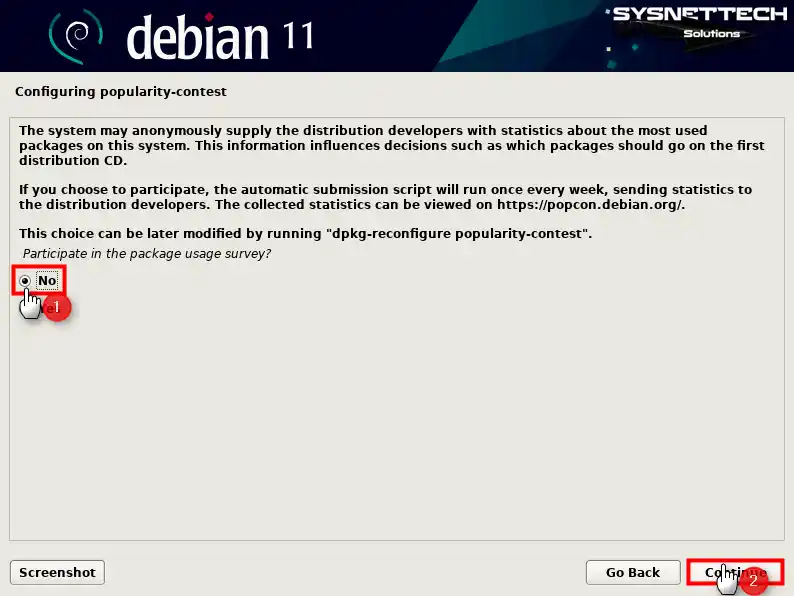
If you’re pleased to share your statistics with Debian developers, you can confidently select “Yes.” However, if you prefer to keep them private, choose “No” and proceed by clicking “Continue.”
Step 23
On the software selection screen, select your preferred Debian desktop environment.

Step 24
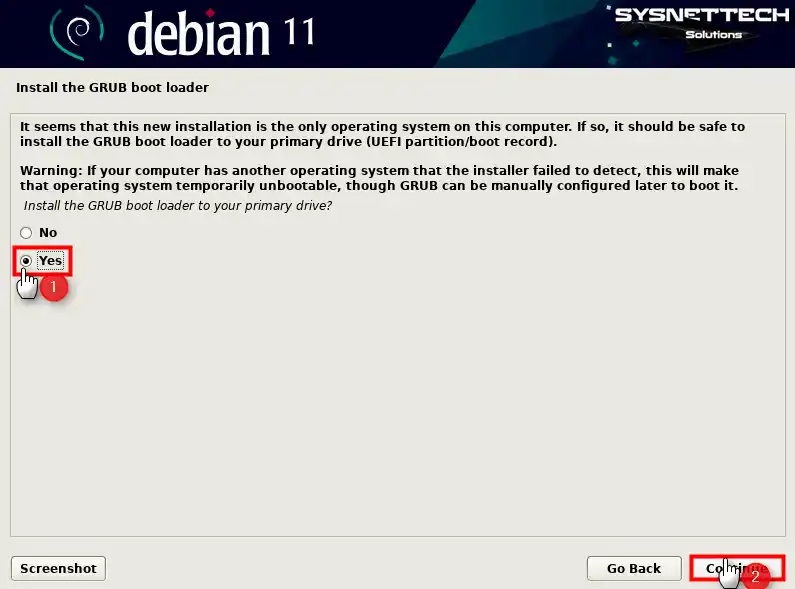
Select Yes to confirm installing the GRUB Boot Loader on the primary partition and click Continue.
Step 25
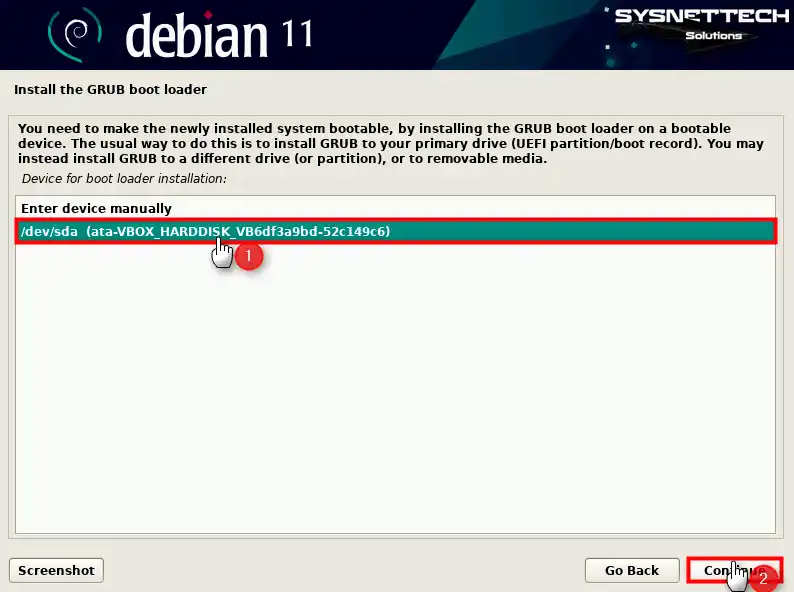
Kindly select the /dev/sda device as the ideal option to install the GRUB Boot Loader.
Step 26
Once the installation process is finished, kindly remove the installation media and reboot your system to utilize your brand-new design.

Step 27
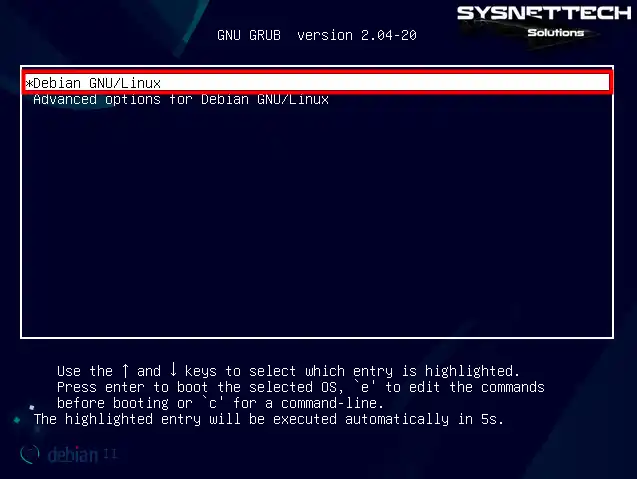
When your Debian guest machine is turned on, press Enter on Debian GNU/Linux from the GRUB menu or wait for the specified time for the selected entry to occur automatically.
Step 28
Type your Debian user account and password and log in.

Step 29
When the Debian 11 desktop opens, find the terminal from the start menu and open it. To check your system version, execute the “lsb_release -a” command in the command console.
lsb_release -a
How to Install Guest Additions to Debian VM
Once you’ve successfully installed Debian with VirtualBox, the next crucial step is to install Guest Additions. For a smoother experience, you can effortlessly modify the screen resolution of your virtual machine while concurrently transferring files between the host and your VM. Additionally, you can enable the Shared Folder feature and start using your USB devices.
Step 1
The display adjustment does not work when expanding the Debian guest system to full-screen mode, as evidenced by the image provided.

Step 2
Click Devices / Insert Guest Additions CD Image from the VirtualBox tool menu.

Step 3
Before installing Guest Additions, you must install Linux kernels; otherwise, you will get an error during compilation. To get started, access the terminal on your Debian system and confidently enter the command “sudo apt install build-essential dkms” to execute it quickly.
sudo apt install build-essential dkms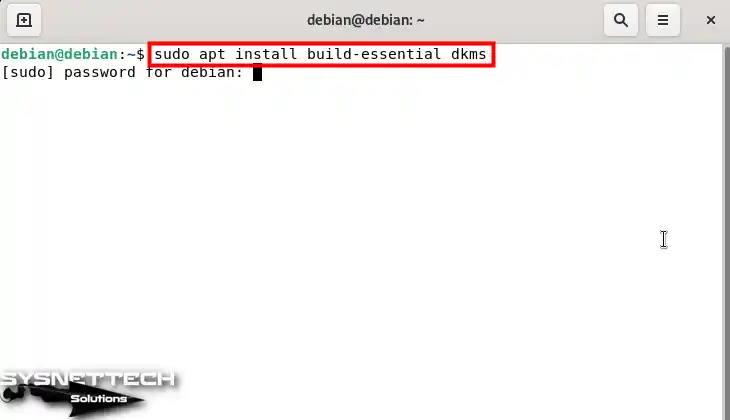
Step 4
After checking the packages to be installed, press Y and Enter to confirm the additional disk space usage of 258 MB.

Step 5
To install Guest Additions using the terminal, you must first go to the cdrom location and run the .run file. To do this, navigate to the image location with the “cd /media/cdrom” command and execute the “sudo sh ./VBoxLinuxAdditions.run” command.
cd /media/cdrom
ls
sudo sh ./VBoxLinuxAdditions.run
Step 6
When the VirtualBox Guest Additions Installer starts, you can see that the Linux kernels are compiled from the outputs in the terminal. After finishing the installation process, you must carry out the command “sudo reboot” to reboot your computer and ensure the successful implementation of the modifications.
sudo reboot
Step 7
After restarting your virtual PC, execute the “sudo /usr/sbin/modinfo vboxguest” command in the terminal to check the Guest Additions version.
sudo /usr/sbin/modinfo vboxguest
Step 8
The virtual machine’s screen resolution has been tailored to fill the entire screen perfectly.

How to Configure Shared Folder
Enabling the Shared Folder feature is the easiest way to share files from your host PC to your virtual computer. This way, you can quickly transfer documents from your host to your VM.
Step 1
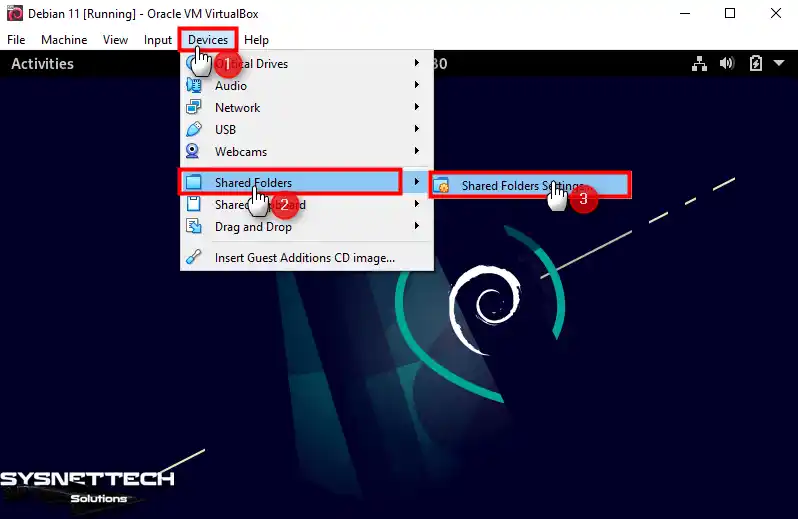
Click Devices / Shared Folders / Shared Folders Settings from the VirtualBox tool menu.
Step 2
After clicking the Add icon in the Shared Folders window, expand the drop-down menu in the Folder Path section and click Other in the Add Share window that opens.

Step 3
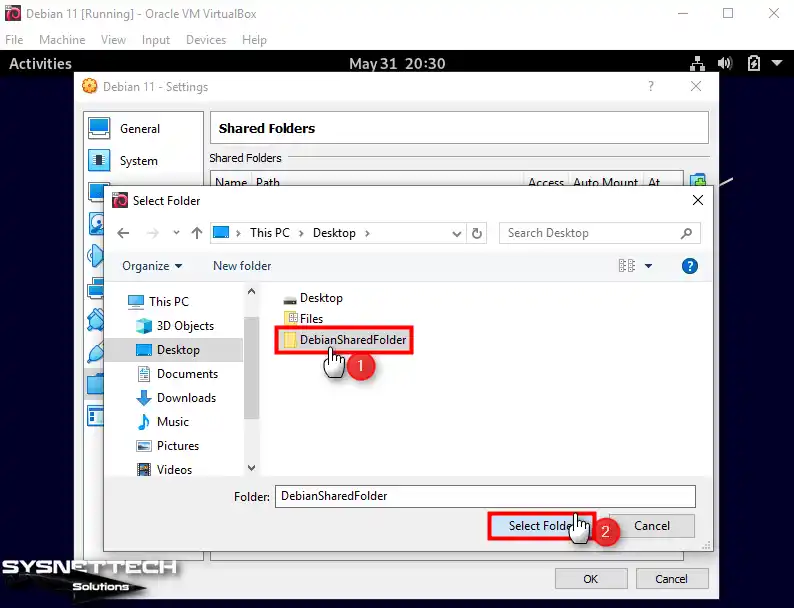
In the Select Folder window, please select a new folder in any location of your host.
Step 4
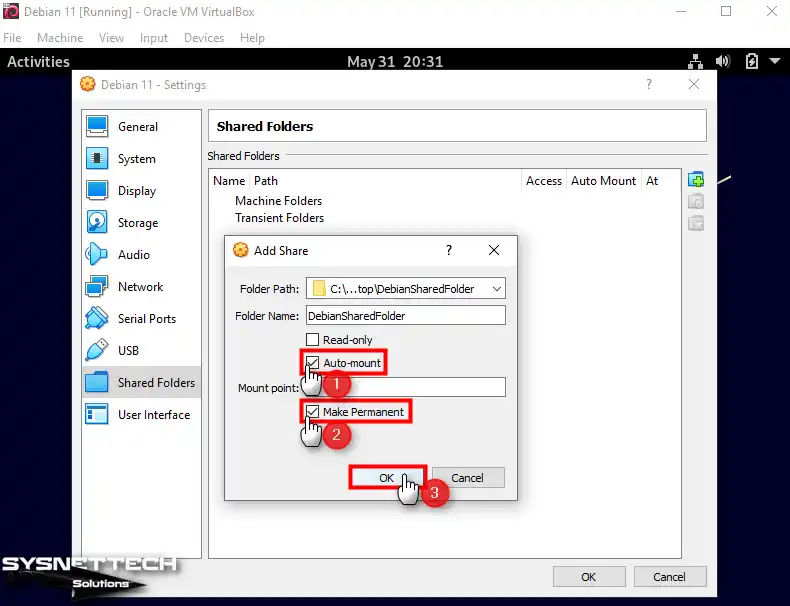
After selecting the shared folder, check the Auto-Mount and Make Permanent options and click OK.
Step 5
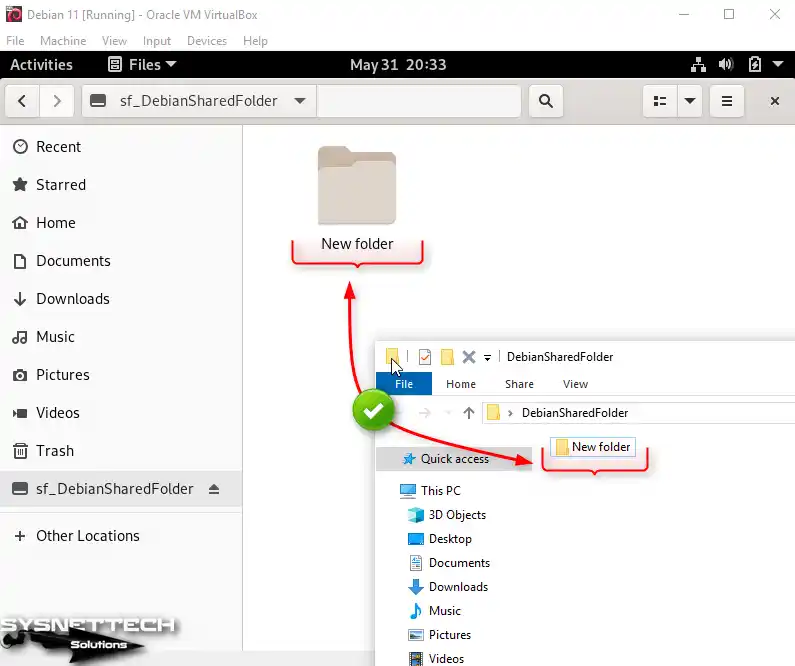
Open Files from your Debian VM and click sf_DebianSharedFolder in the Bookmark section to view the contents of the sharing folder. You must edit the user permissions if you get an error like the image below.

Step 6
Open the terminal and execute the “sudo adduser $USER vboxsf” command to allow your local user account access to Shared Folders.
sudo adduser $USER vboxsf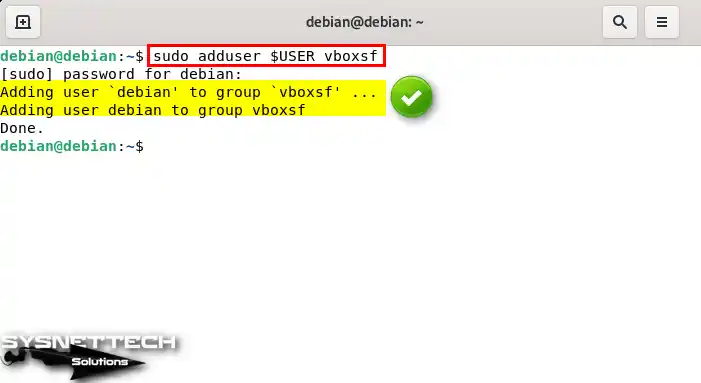
Step 7
Restart your virtual system and check whether you can reaccess Shared Folder, and this time you can see that the process is smooth.
How to Use a USB Flash Memory in Debian Guest Machine
You can use your USB storage devices to quickly copy or back up your documents with large file sizes between your host and your VM. An effortless method to ensure your files are backed up is simply linking an external SSD that supports USB 3.0/3.1 to your virtual computer.
Step 1
Insert a flash memory into your host’s empty USB 3.x port and create a Backup folder.

Step 2
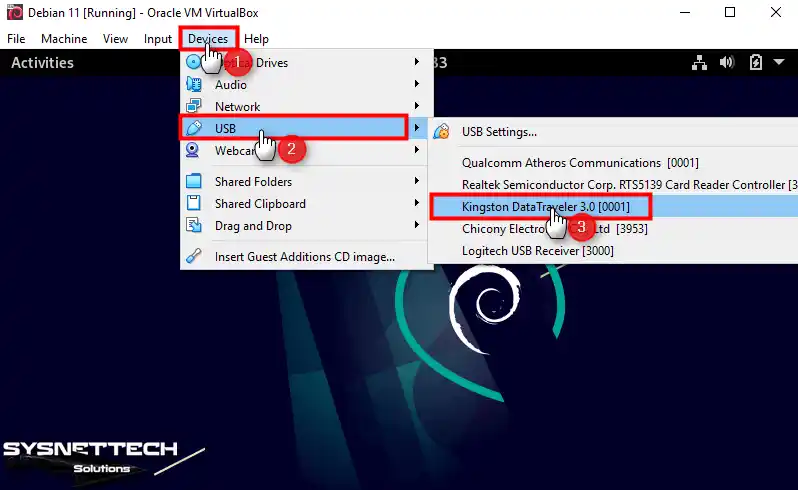
Click Devices / USB / Name of your USB from the tool menu to mount your USB flash drive in your Debian VM.
Step 3
After your USB disk is automatically mounted to your virtual machine, you can see the folder named Backup you created when you view its contents.

Video
Installing Old Versions
Conclusion
As a result, you can install the Debian system as a secondary on the virtual machine with Oracle VM VirtualBox. In this case, you can continue your work without affecting your primary operating system.
Thanks to the versatile features of VirtualBox, you can use both Windows and Linux distributions. You can create a Debian machine that suits your needs using the steps I explained.

Thank you for sharing. Your instructions were spot on.