In this article, we will examine how to set up GNS3 VM 2.2 on VMware Workstation 16 Pro so that Cisco IOU images can be used with GNS3 on a Kali Linux 2024 computer.
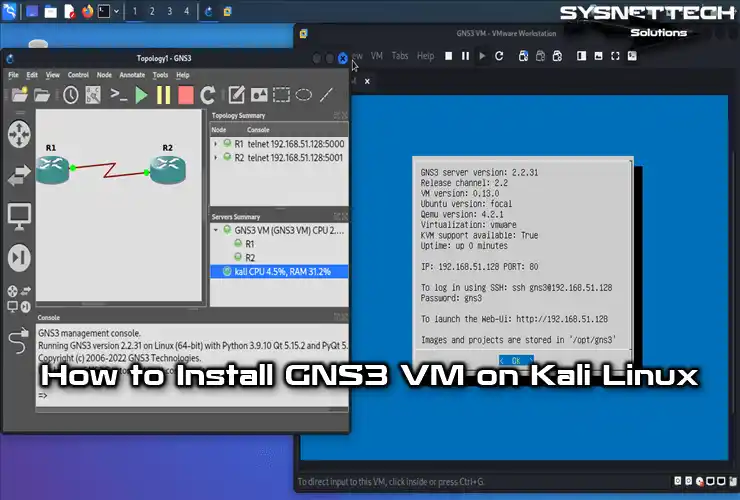
How to Set Up and Use GNS3 VM Server 2.2.33.1 on Kali Linux 2022.3
GNS3 VM (GNS3 Virtual Machine) is a free virtual server machine that can be used with GNS3. You can import this VM using a virtualization program installed on your system and use it with the network simulator program.
GNS3 VM is used to create more professional network designs, increase device performance, or back up all projects and iOS devices in a single virtual server. It also allows you to operate these devices by uploading IOU images to the server, enabling you to use more detailed commands.
You can start preparing for Cisco’s Routing and Switching exams by installing the GNS3 virtual machine with GNS3 on your desktop or laptop computer on which you have a Windows or Linux distribution.
Requirements
Before installing the GNS3 VM on your computer, you must have the GNS3 and VMware Workstation programs installed on your system. In order to install the virtual server on the Kali distribution, you can browse our articles below to install the programs mentioned on this system.
How to Download and Install GNS3 VM
After installing it on your VMware Workstation system with GNS3, you need to download the GNS3 VM.ova file from the GNS3 official website and transfer it to the virtual machine.
Step 1
You must download GNS3 VM for VMware Workstation and Fusion software. To do so, visit the GNS3 official website, click the Download button on the page you are viewing, and then save the zip file to your computer.

Step 2
To extract the GNS3VM.zip file you downloaded to the Downloads location, open the terminal at that location and execute the “unzip GNS3.VM.VMware.Workstation.2.2.33.1.zip” command.
unzip GNS3.VM.VMware.Workstation.2.2.33.1.zip
Step 3
Open VMware Workstation 16 Pro and click File / Open from the tool menu. In the Open Virtual Machines window, select the GNS3 VM.ova file and open it.

Step 4
When the Store the New Virtual Machine window opens, configure the location where you want to save the virtual machine and click the Import button.

Step 5
Wait while the GNS3 VM is being imported into the VMware virtualization program.

Step 6
After adding the GNS3 virtual server machine, click Edit Virtual Machine Settings to edit its settings.

Step 7
Click Processors on the left panel to enable virtualization features and increase the number of virtual processors in the GNS3 virtual machine. Configure the Number of Processors as 2 and tick all the features in the Virtualization Engine section.
- Virtualize Intel VT-x/EPT or AMD-V/RVI
- Virtualize CPU Performance Counters
- Virtualize IOMMU (IO Memory Management Unit)

Step 8
After making the GNS3 VM settings, run the virtual machine.

Step 9
Note down the IP address after the GNS3 server is successfully booted.

How to Enable GNS3 VM
After installing the GNS3 virtual machine, you need to configure the server settings in the GNS3 program.
Step 1
After opening the GNS3 network software program, click Next in the Setup Wizard window and select Run appliances in a virtual machine.

Step 2
In the server configuration window, configure the Host Binding setting as the IP block of the GNS3 server and click Next.

Step 3
Click Next after checking that the connection is successful in the local server status window.

Step 4
In the GNS3 VM settings, select VMware from the Virtualization Software section, set the vCPU value to 2, and click Next.

Step 5
After checking the hardware settings in the GNS3 Virtual Machine summary window, click Finish.

Step 6
You can see the successful connection to the GNS3 VM in the Servers Summary section.

How to Add Cisco Router IOS
After installing the GNS3 VM on Kali Linux, you need to install Cisco Router or Switch IOS images on the virtual server. Please note that the IOS devices you will add to the server will only work when the server is running.
Step 1
After clicking File / Preferences from the GNS3 tool menu, select Dynamips / IOS Routers in the window that opens and click the New button on the right panel to open the IOS add wizard.
From the Server Type options in the wizard, select “Run this IOS Router on the GNS3 VM” and click Next.

Step 2
Click the Browse button and select the IOS image of a Cisco Router you downloaded to your computer.

Step 3
Click Yes to decompress the IOS image and then wait for the IOS to upload to the server.

Step 4
Do not change the name and platform of the c7200 IOS image.

Step 5
Assign a suitable RAM size to the Router according to your host’s performance.

Step 6
Since the Router defaults to a FastEthernet interface, to add a Serial interface, insert a PA-4T+ Serial port into Slo1 in the network adapter window.

Step 7
Set the Idle-PC value to prevent the Router image you added from using 100% of your computer’s CPU.

Step 8
After adding the Router IOS, you can see that the Server part is the GNS3 VM in the Templates window. That is, the IOS image will run on the virtual server, not on your local PC.

How to Create a New Project
After adding IOS to the GNS3 server, please create a new project to test its operability or to start making a basic network topology.
Step 1
Press the New icon or CTRL + N in the GNS3 tool menu to open the project wizard. Depending on the network design you will create in the Project window, type a suitable project name, select the backup location, and click OK.

Step 2
Click on the Routers category from the left panel and drag and drop two c7200 Routers into the workspace.

Step 3
After activating the cabling option from the left panel, click on R1 and plug one end of the cable into Serial1/0 from the empty ports listed. Plug the other end into the Serial1/1 port of R2.

Step 4
After connecting the routers through the serial interface, click the green arrow in the menu and run all devices. Then, double-click R1, open the CLI prompt, and assign an IP address to the serial port.
R1# conf t
R1(config)# interface serial1/0
R1(config-if)# ip address 192.168.1.1 255.255.255.0
R1(config-if)# no shutdown
Step 5
Likewise, assign an IP address to the Serial1/1 port of the other R2 Router.
R1# conf t
R2(config)# interface serial1/0
R2(config-if)# ip address 192.168.1.2 255.255.255.0
R2(config-if)# no shutdown
Step 6
You can add a PC to the workspace or use the ping command from the CLI command prompt to check the network connection between routers.
R1# ping 192.168.1.2
R2# ping 192.168.1.1
How to Delete and Disable the GNS3 Virtual Machine
If you want to delete or remove the GNS3 VM from your PC, you must first wholly delete the virtual machine from your disk from your virtualization program. Then, you should turn off the virtual server from the GNS3 program and make the local server connection.
Step 1
After opening the VMware Workstation program, right-click your virtual computer in the Library section on the left panel and select Manage / Delete from Disk from the options that appear.
In the Question window that opens, click Yes to confirm the deletion of all files of the VM from your host disk.

Step 2
To disable the GNS3 VM, view GNS3’s preferences, uncheck “Enable the GNS3 VM” from the GNS3 VM settings, and click OK.

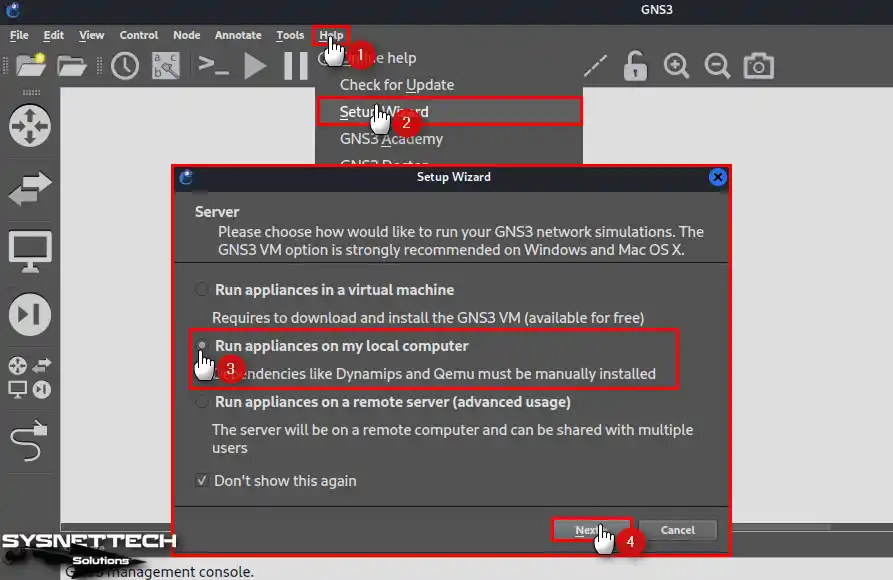
Step 3
From the GNS3 tool menu, click Help / Setup Wizard to open the configuration mode. In this window, check “Run appliances on my local computer” and click Yes to completely disconnect GNS3 from the virtual server and connect it to the local server.
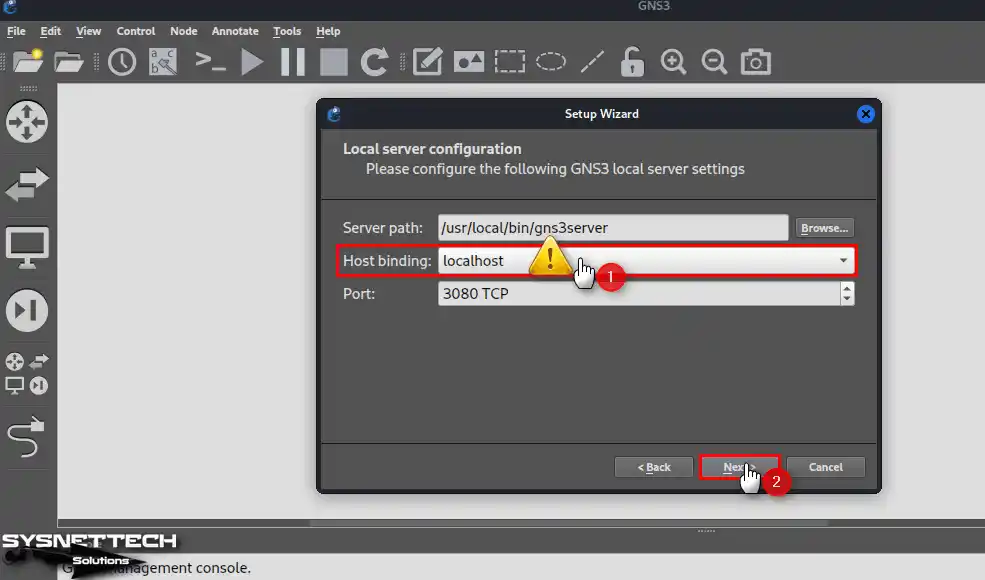
Step 4
In the local server configuration window, change the Host Binding setting to “localhost” this time.
Step 5
Close the Setup Wizard after verifying the local server connection.

Step 6
Finally, you need to delete the IOS you have added to the GNS3 Server. You can see from the image below that the location where the Router is installed is “VM” before deleting it.

Step 7
Add a Router to your GNS3 program using the existing IOS again, and in the last step, check that the server type is local.

Step 8
When you run the Router, the Servers Summary section shows that the server is not available and is running on the local system.

Video

TolgaBagci
Hi, I'm Tolga, a computer expert with 20 years of experience. I help fix computer issues with things like hardware, systems, networks, virtualization, servers, and operating systems. Check out my website for helpful info, and feel free to ask me anything. Keep yourself in the loop about the newest technologies!