Are you planning to install Windows 8 & 8.1 with Oracle VM VirtualBox 7.0 on Windows 11 or 10? Then, in this guide, I will explain the steps of creating a virtual machine and installing this OS.
Moreover, I will explain how to configure the virtual system settings in a good way. So, it doesn’t matter if you are experienced because there may be points you miss in the VM settings. That’s why I prepared this guide with you in mind. Let’s follow the steps and get virtual Windows 8 up and running!

How to Set Up the Microsoft Windows 8 & 8.1 on Windows 11 PC using VirtualBox 7.0
Microsoft released the NT-based Windows 8.1 operating system on April 8, 2014, as an upgraded version 8, feeding improved features and improvements. Mainstream update support for Windows 8.1 was terminated on January 9, 2018, but extended support will be entirely completed on January 10, 2023.
The Windows 8/8.1 OS dramatically enhances the desktop experience, particularly with the improved Metro interface. Allowing high resolutions, this distribution of this OS has new technologies such as 3D printing functions, Wi-Fi Direct, and Miracast.
Today, although Windows XP or 7 systems are still used on personal or corporate computers, Windows 8x versions have been included in newer-generation desktop/laptop computers.
Many people around the world used Microsoft’s free upgrade for Windows 10 Home or Pro for old product keys. Because of this, a lot of people have now updated to the latest version of Windows.
We recommend using virtual machines if you want to use a great-looking version of 8x instead of Windows 10 or 11 on your physical computer. Using Microsoft’s latest distribution, the Windows 11 system on your host computer offers you security and performance and protects you on online platforms.
By utilizing the Oracle VM VirtualBox program, you gain the ability to efficiently run operating systems such as Windows, Linux, and even macOS on your PC, expanding your computing possibilities. It also provides a powerful virtualization solution for business and home users, supporting Intel and AMD-powered systems.
VirtualBox software is exhaustively consistent and works seamlessly with multiple software platforms, including Windows, Linux, Macintosh, and even Solaris. If you have a Laptop or Desktop computer processor that supports virtualization technology, you can use this virtual machine software.
Typically, when installing a virtual operating system using VirtualBox, the ISO file of the respective operating system is employed. In addition, installing an operating system with your physical computer’s DVD/CD drive is possible.
First, you must create a new machine using Oracle virtualization software to run Windows 8.1. After setting up the system, you can install the Guest Additions software so you can use the virtual PC in full-screen mode and transfer files between the host and the virtual computer.
How to Build a New Virtual Machine for Windows 8 OS
After installing VirtualBox on your host computer, install the Extension Pack software. Suppose you install one of the Windows 8 or 8.1 versions after running the virtualization program later. In that case, you must select the relevant system version in the virtual machine wizard.
Before building the Windows 8 system on your PC using a virtual device, please download its ISO file from and keep it on your computer.
Step 1
Start the virtual machine wizard on the homepage of the Oracle VM software with the Machine / New (or Ctrl+N) shortcut from the tool menu or by clicking the New button.

Step 2
After opening the virtual machine preparation wizard, type Windows 8.1 in the Name field. After typing the name of your system, the operating system’s platform will be automatically selected in the Type and Version section.
You can change the location of the VM you will install with the Machine Folder option. Suppose you are going to install it on your host’s disk device. In that case, you will experience performance problems using an NVMe or SSD storage device. Therefore, you can improve performance by installing your virtual appliance on a storage apparatus with an external USB 3.0/3.1 or Type-C interface.
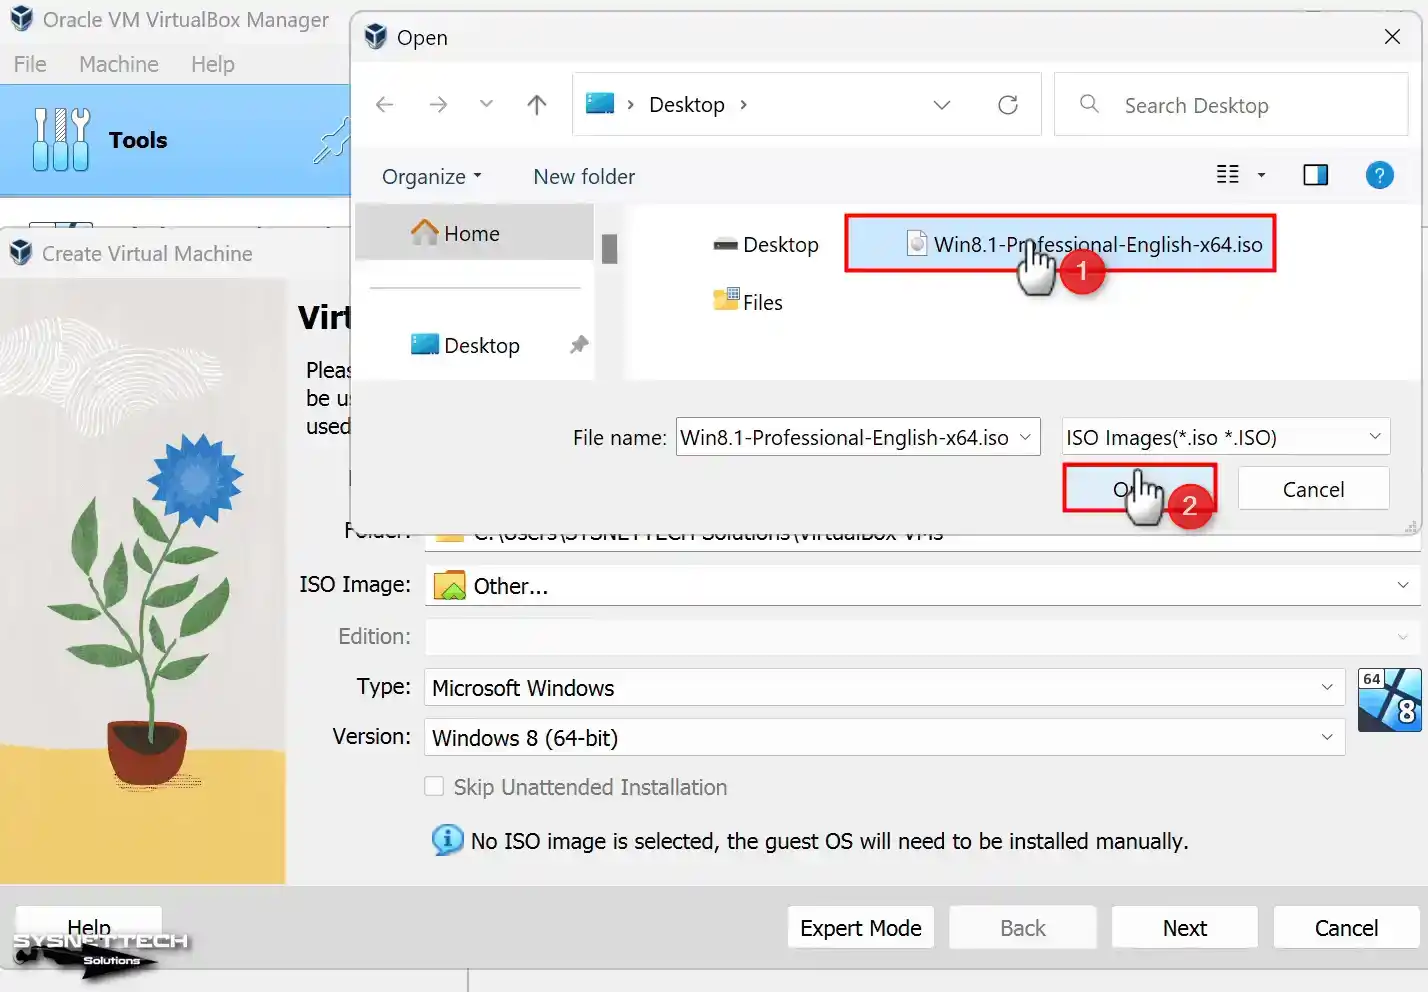
To add a Windows 8.x ISO file to the virtual pc, click Other from the drop-down menu in the ISO Image section.

Step 3
Within the opened window, choose the Microsoft Windows 8.1 Pro x64 ISO image that you previously downloaded to your computer and proceed by selecting it.
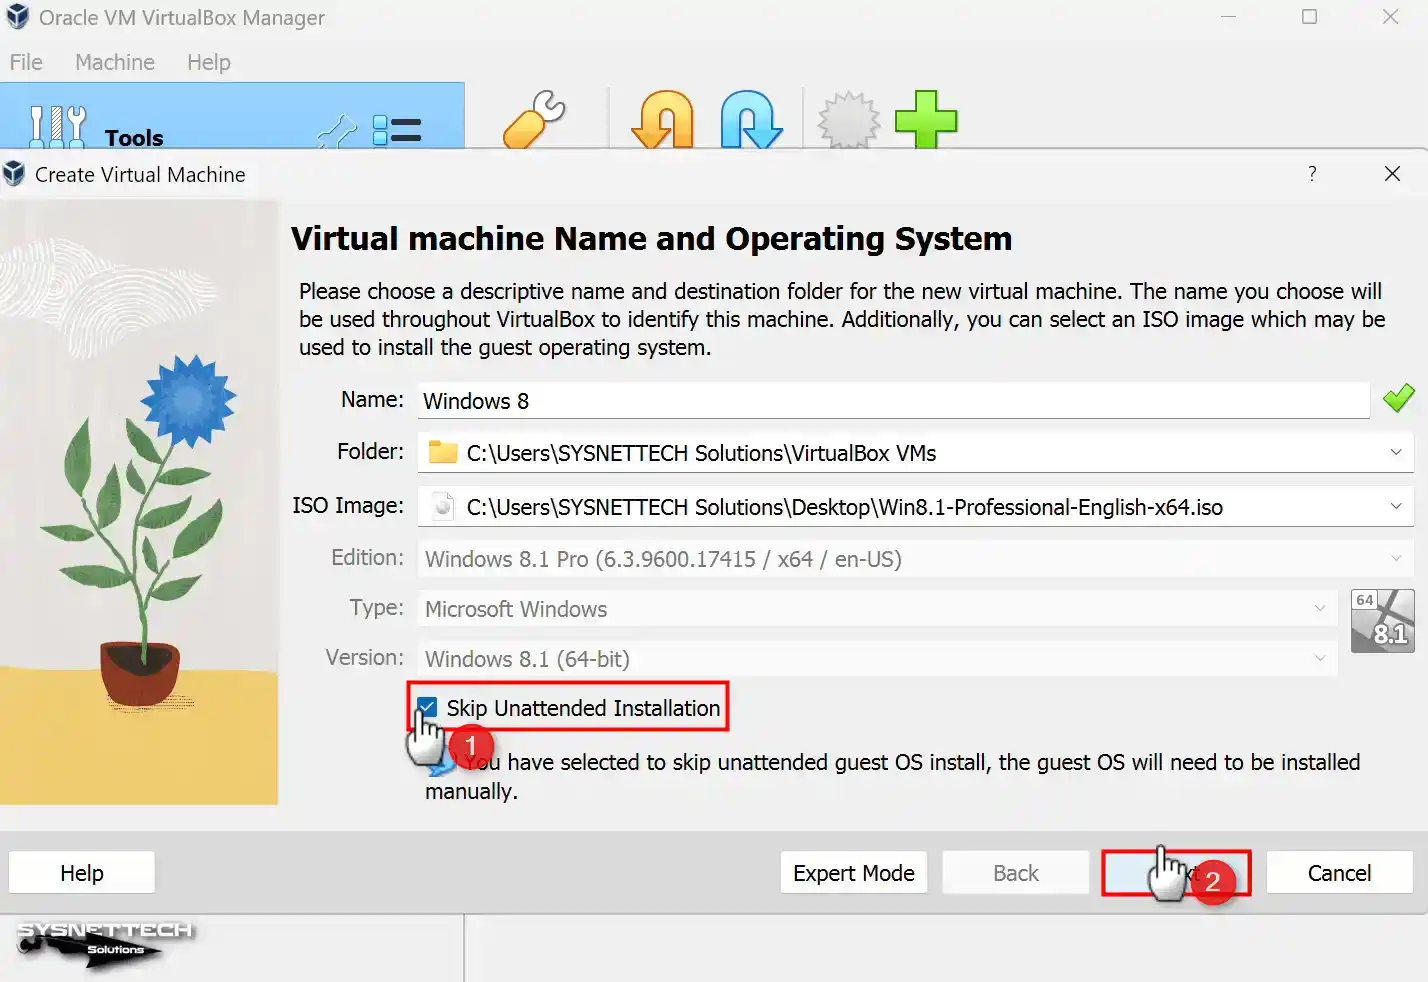
Step 4
With the unattended installation feature in the 7.x versions of VirtualBox, you can make faster system setups faster. However, as there is no need for such an operation, check the Skip Unattended Installation option.
Step 5
Set the minimum RAM size for the Windows 8x system according to the RAM capacity supported by your host computer. Suppose your host PC possesses 16 GB of RAM, and you intend to utilize the Win8.1 virtual appliance on your system exclusively. In that case, you can configure the RAM value to 8 GB.

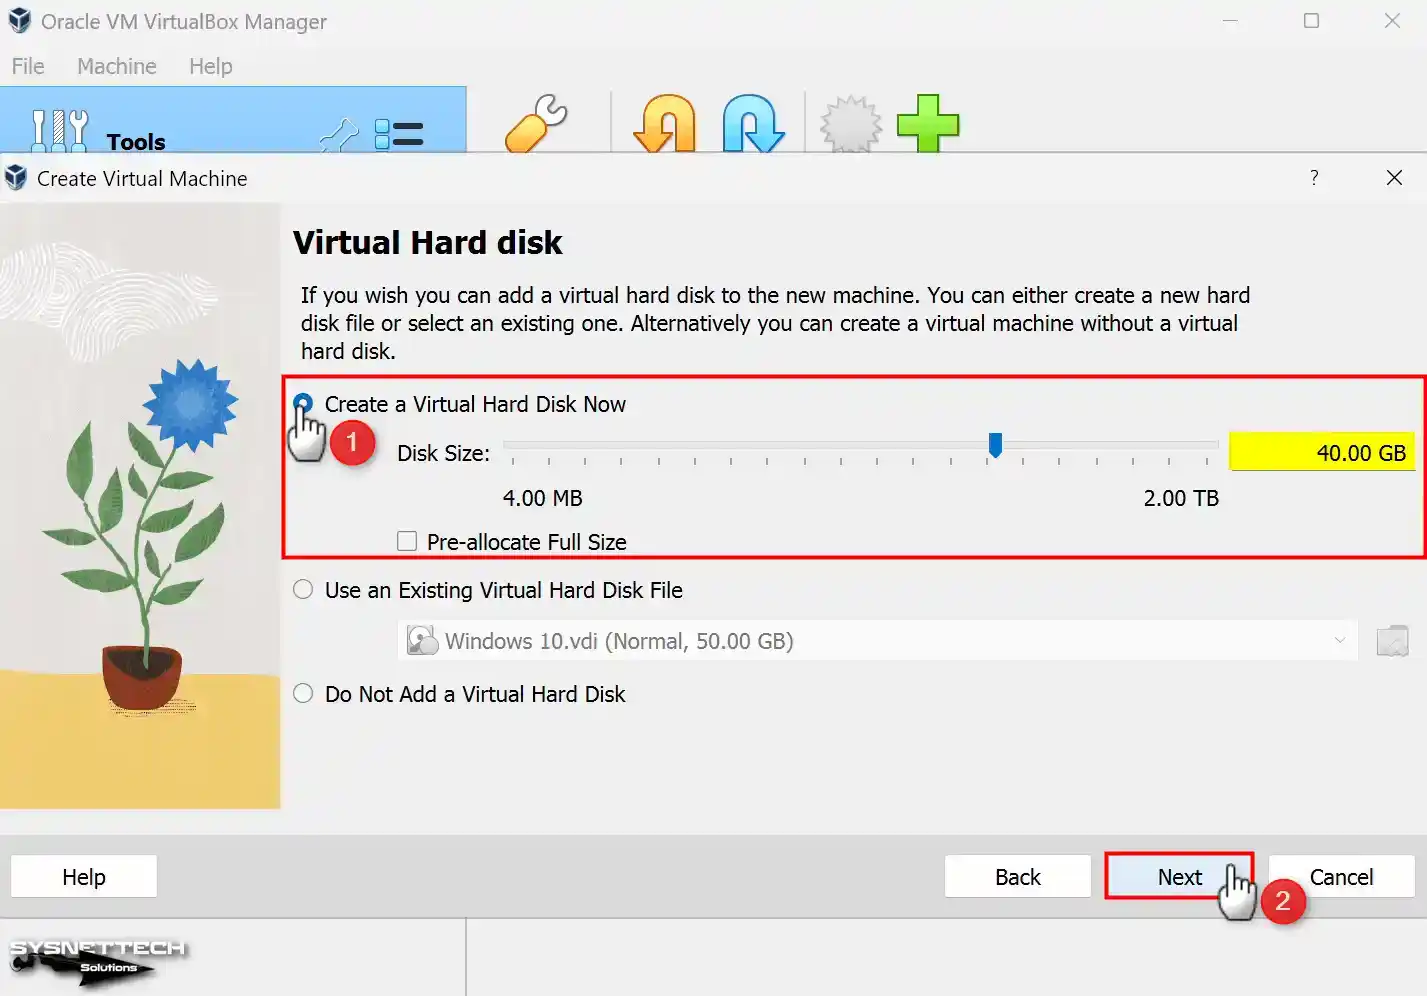
Step 6
Within the machine’s hard disk settings window, you can add an existing virtual disk that you previously set up with VirtualBox or create a new vdisk, depending on whether you intend to establish Windows 8 from scratch.
To create a new virtual HDD for a clean system installation, continue with Create a virtual disk, which is now selected by default.
Step 7
After creating the Windows 8.x guest machine, check the virtual hardware devices and close the window.

Step 8
Click Settings further to configure the hardware settings of the virtual machine.

Step 9
Configure the Shared Clipboard and Drag and Drop features to Bidirectional in the General / Advanced settings of the virtual pc.

Step 10
In the System / Motherboard settings, untick the Floppy sign from the devices in the Boot Order list and click the down arrow to lower it to the bottom row.
Also, enable Secure Boot to make your virtual computer more secure.

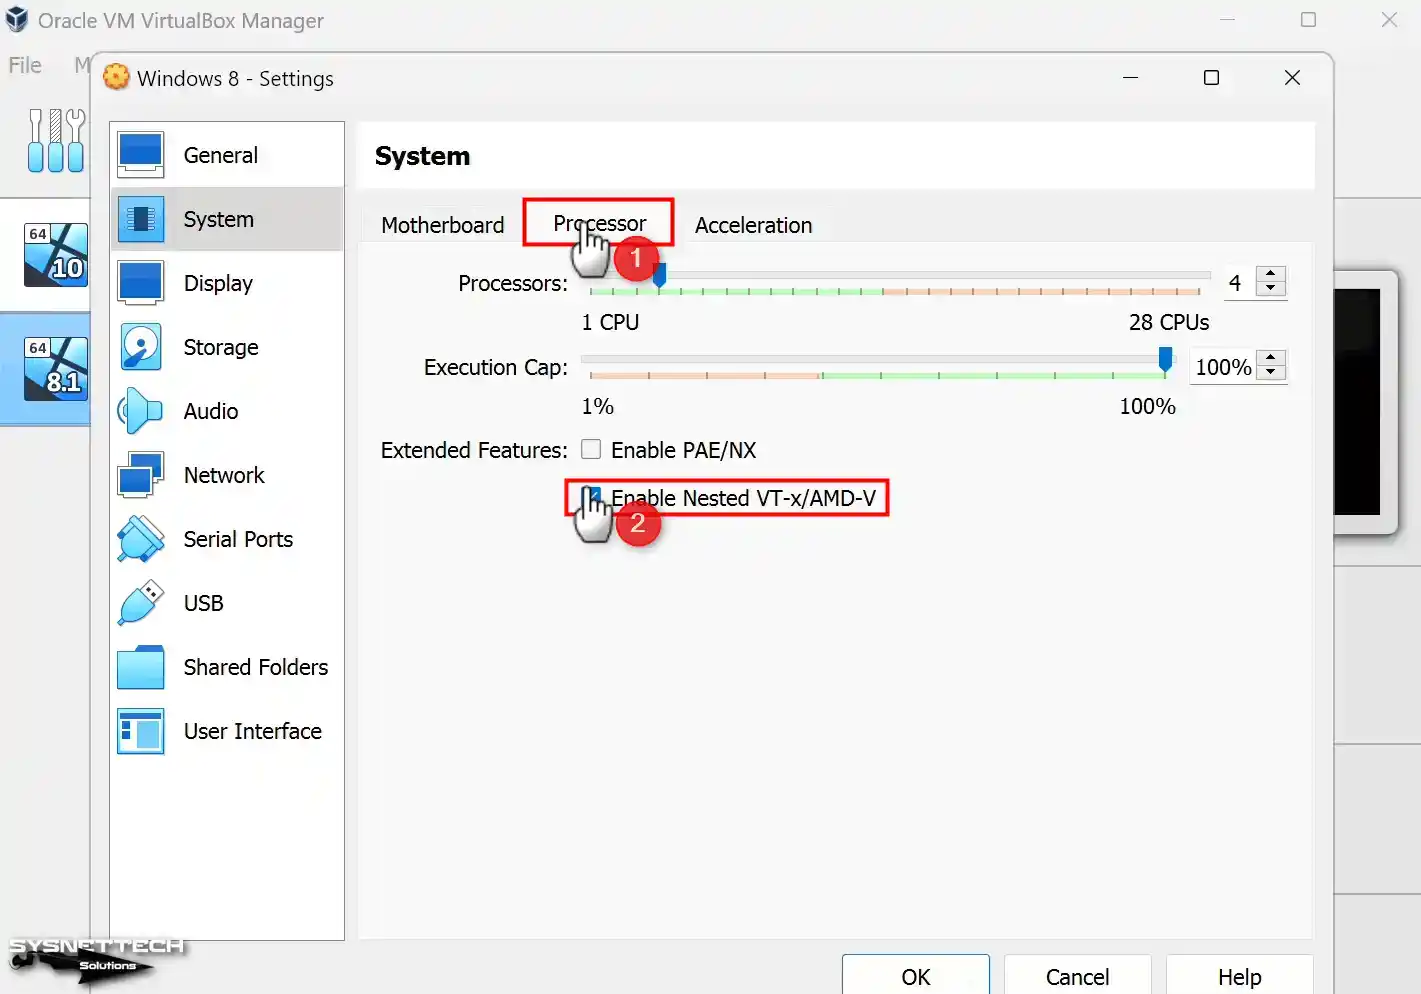
Step 11
Specify the number of virtual CPUs your host can support for the Processor virtual hardware, and enable the Nested VT-x/AMD-V feature if you plan to run virtual systems on your VM.
Step 12
Enable Nested Paging for better memory management between the virtual system and your host.

Step 13
To make the graphics better on the Display/Screen device, turn on the 3D Acceleration option and set the Video Memory to 256 MB. This will improve the visuals and give more explicit images.

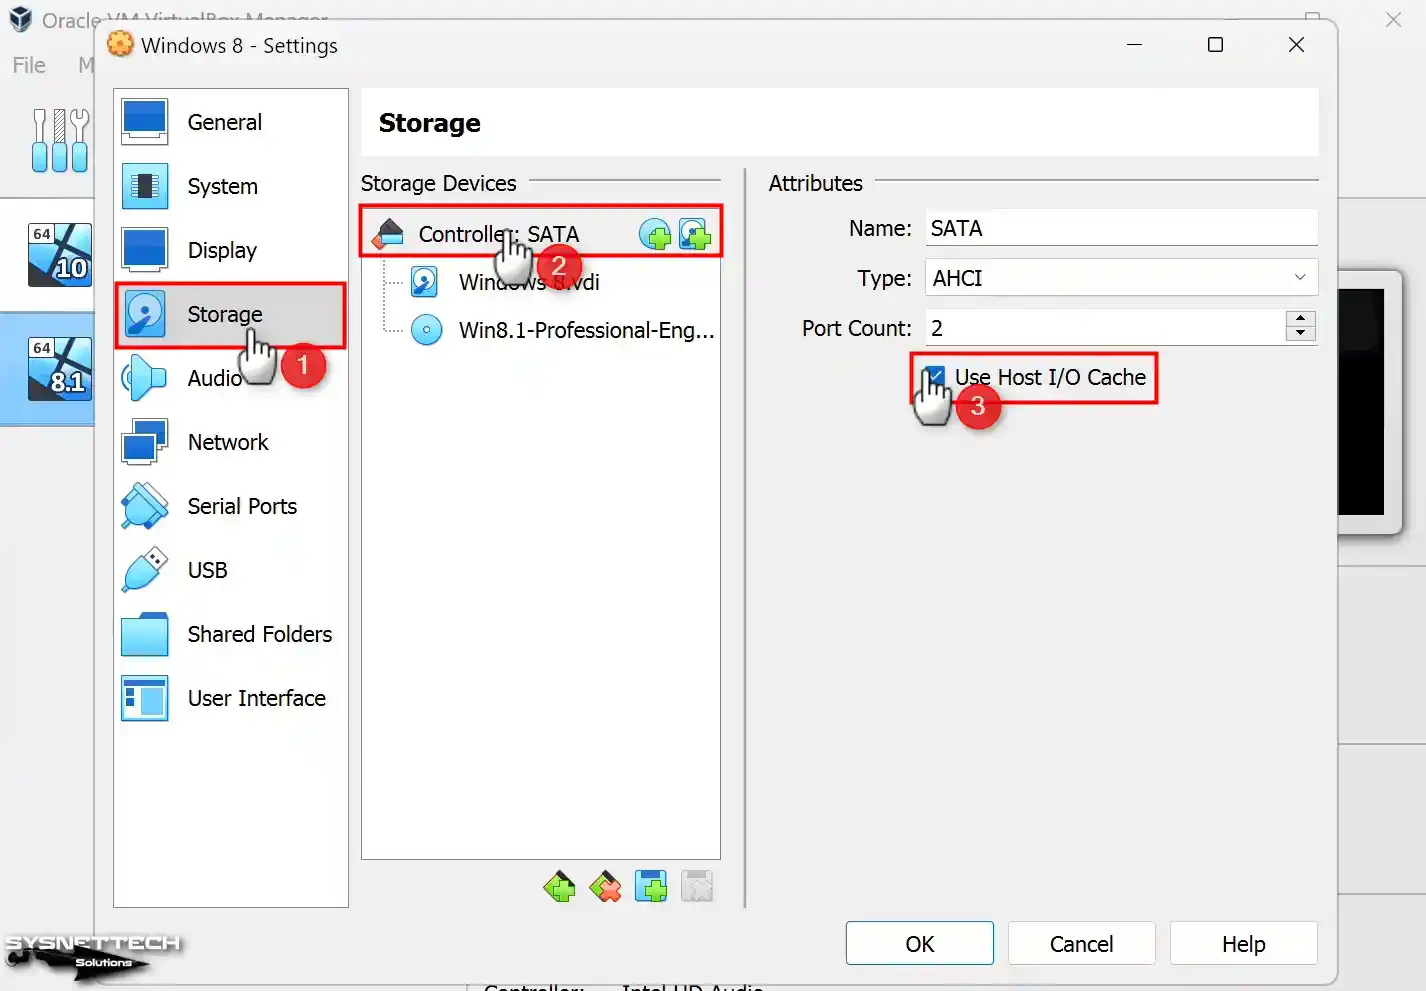
Step 14
To improve the performance of your virtual PC, enable the Host I/O Cache feature of the Storage device’s controller.
Step 15
Since you will install Windows 8 on the NVMe virtual disk, delete the VDI disk from the SATA controller.

Step 16
Add NVMe controller to your Win8 virtual machine.

Step 17
After adding the NVMe disk controller, add the Windows 8.vdi virtual disk and enable Host I/O.

Step 18
Enable Solid-State Drive (SSD) to adapt the VDI disk to SSD performance.

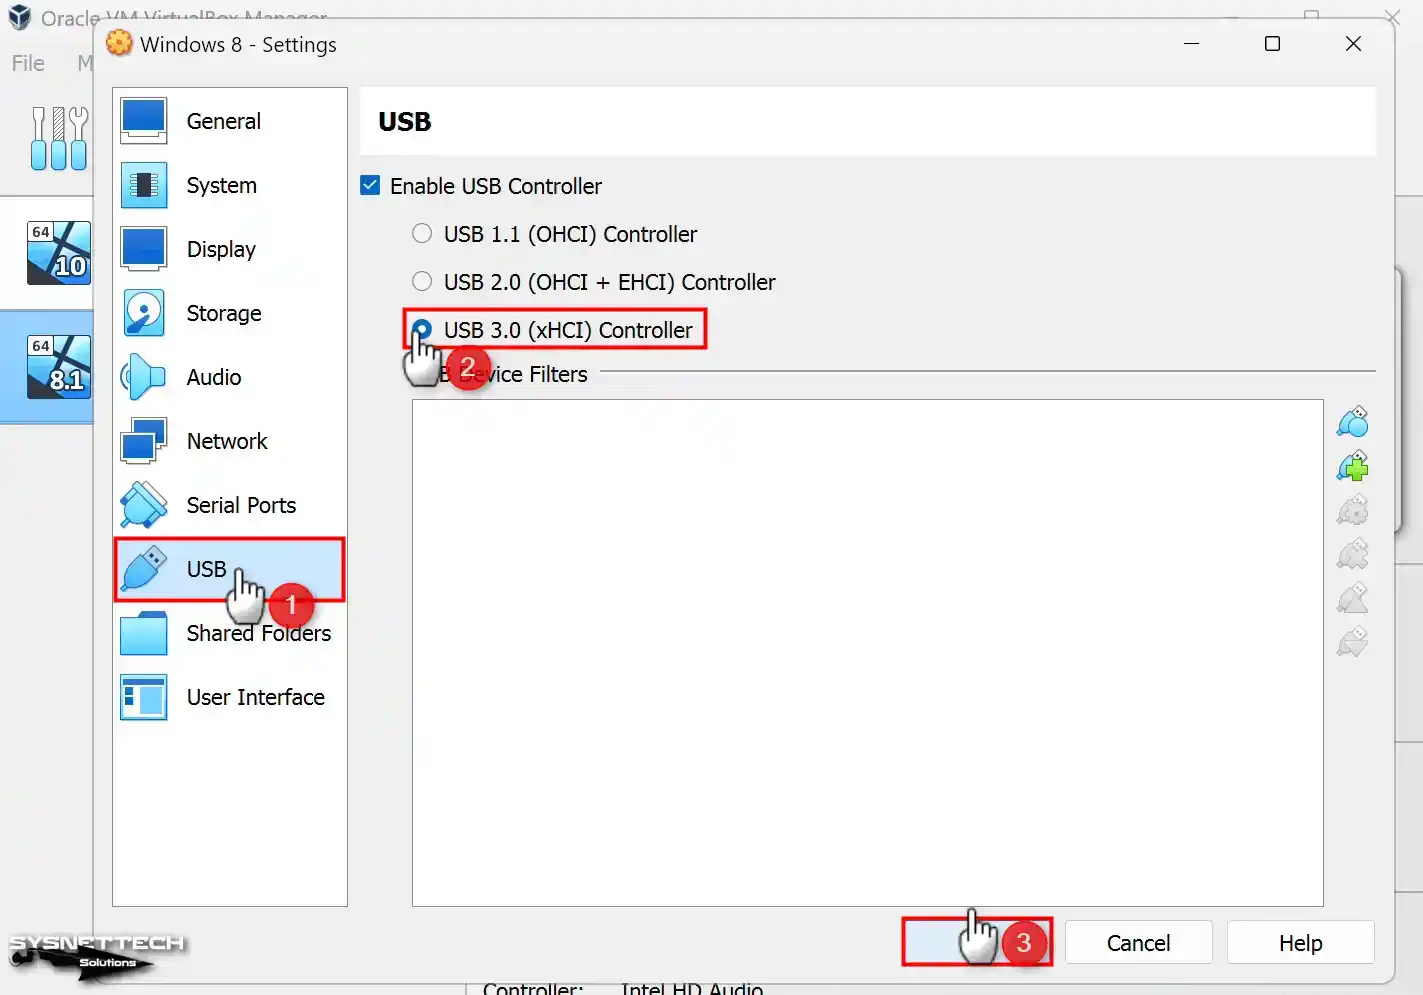
Step 19
Ensure the 3.0 (xHCI) controller is enabled to use your USB 3.x storage devices or flash drives in your VM.
Step 20
To install the system on NVMe disks in VirtualBox without problems, you must configure MSI support and MemBufSize. Otherwise, you cannot see the virtual disk during installation.
Open PowerShell or CMD in the location where the virtualization program is installed and execute the codes below.
.\VBoxManage setextradata 'Windows 8' "VBoxInternal/Devices/nvme/0/Config/MsiXSupported" 0
.\VBoxManage setextradata 'Windows 8' "VBoxInternal/Devices/nvme/0/Config/CtrlMemBufSize" 0
Step 21
To initiate the Windows 8.1 installation process, click the Start button to run the VM and commence the setup.

How to Install Windows 8 in VirtualBox
Once you have booted your virtual pc using the ISO image, the Windows setup wizard will guide you through installation. Similarly, the installation wizard can establish it on a physical computer.
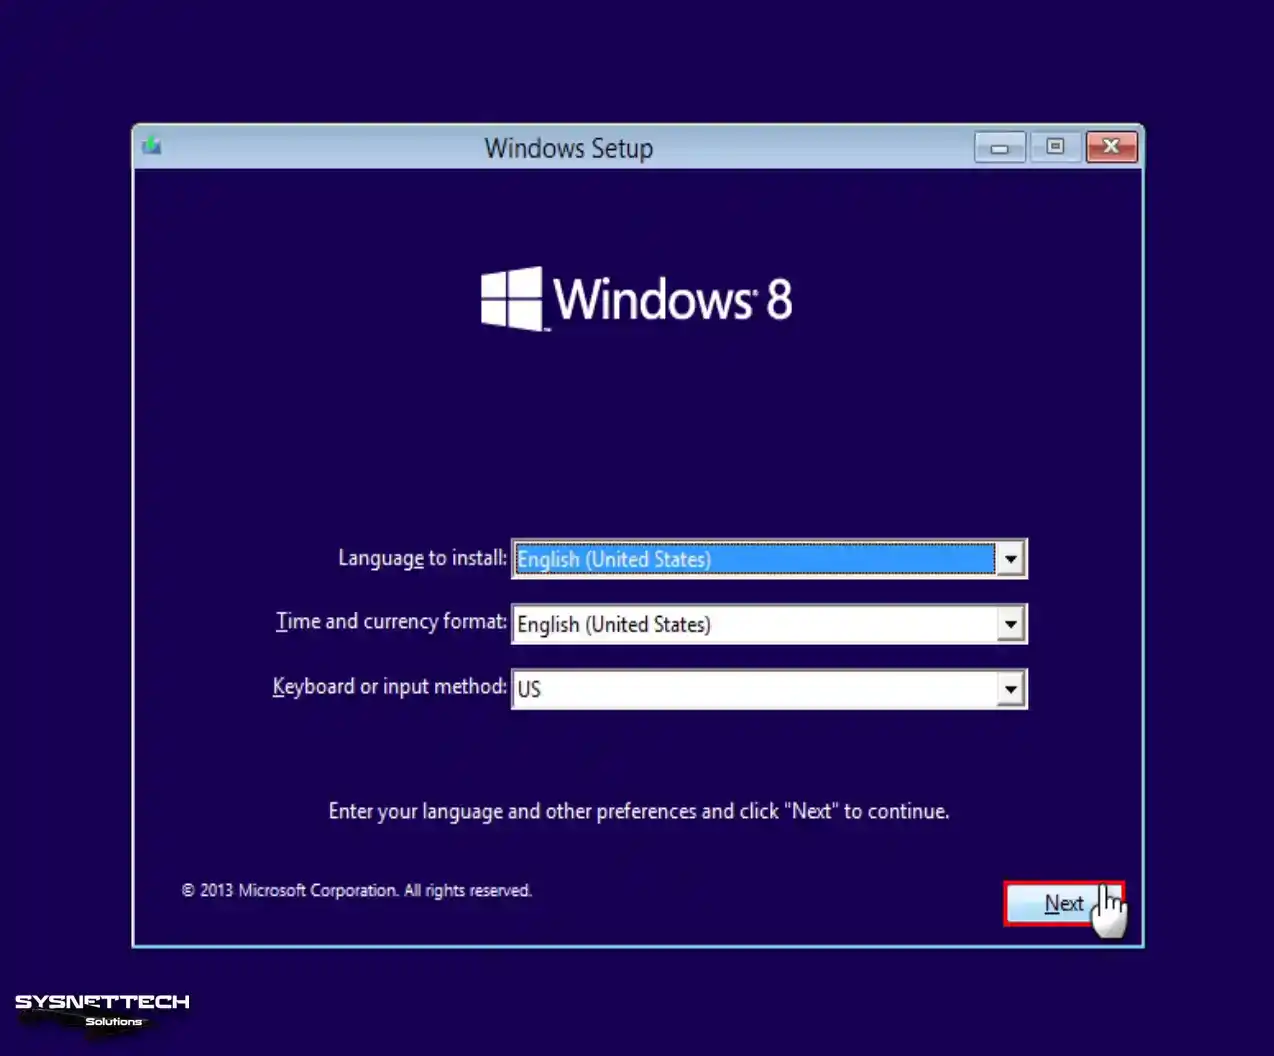
Step 1
Upon reaching the Windows 8 format screen, proceed by selecting your desired system language, time zone, and keyboard layout, then click on the “Next” button.
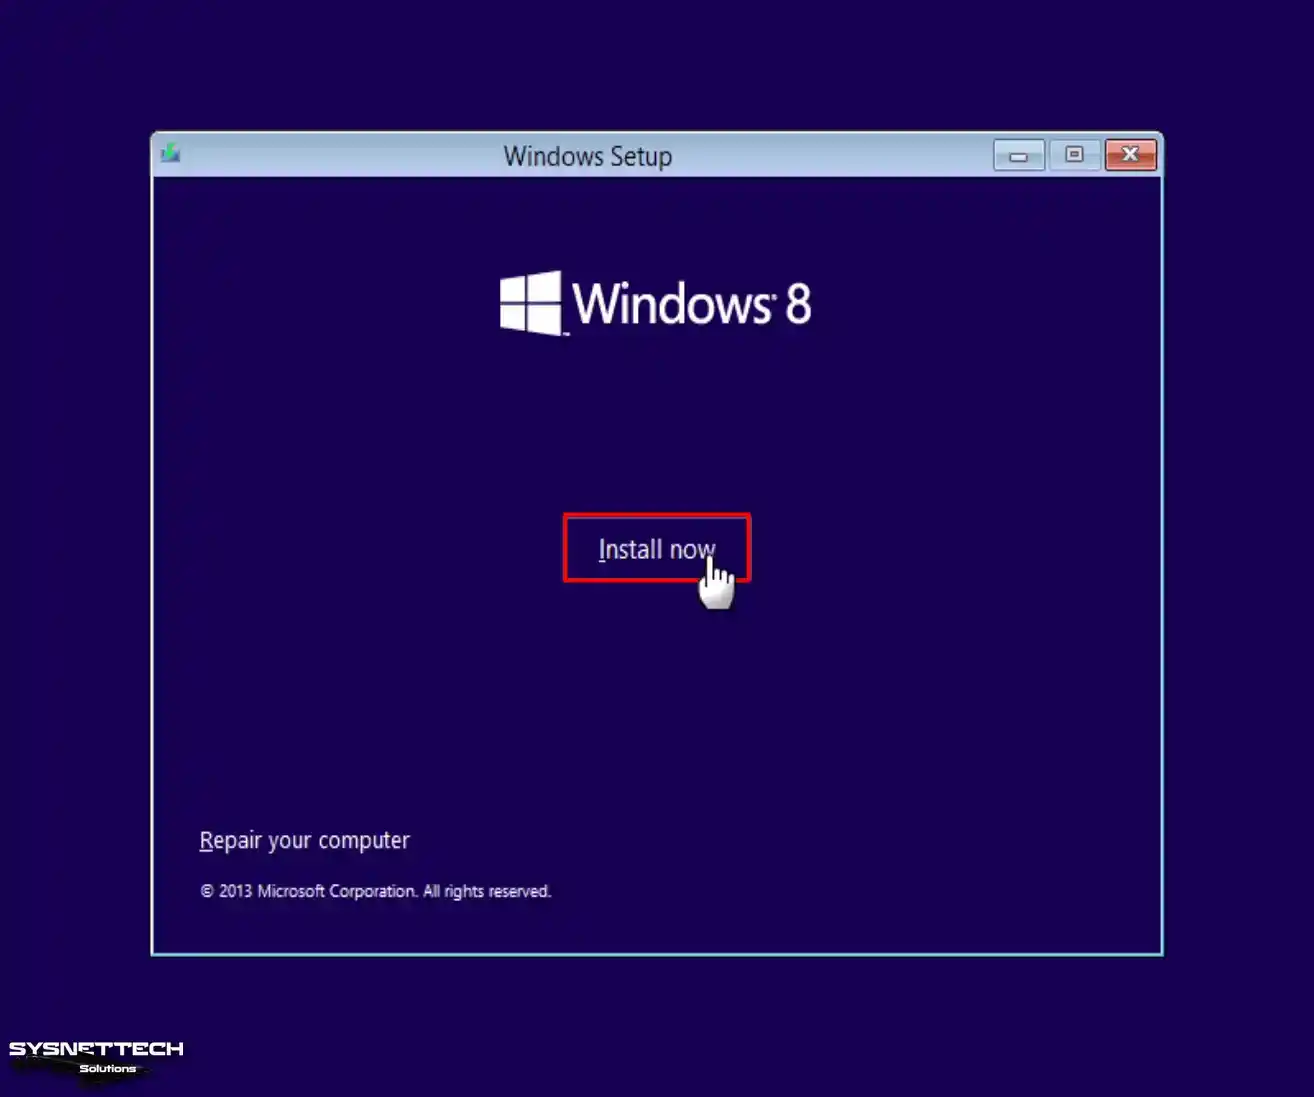
Step 2
In the Windows Setup window, find and click the “Install Now” button to start the Win8 installation.
Step 3
If you have a genuine Win8/8.1 product key, type your relevant license key.

Step 4
To proceed, accept the license deal of the Win8.1 platform by hitting the “Next” button.

Step 5
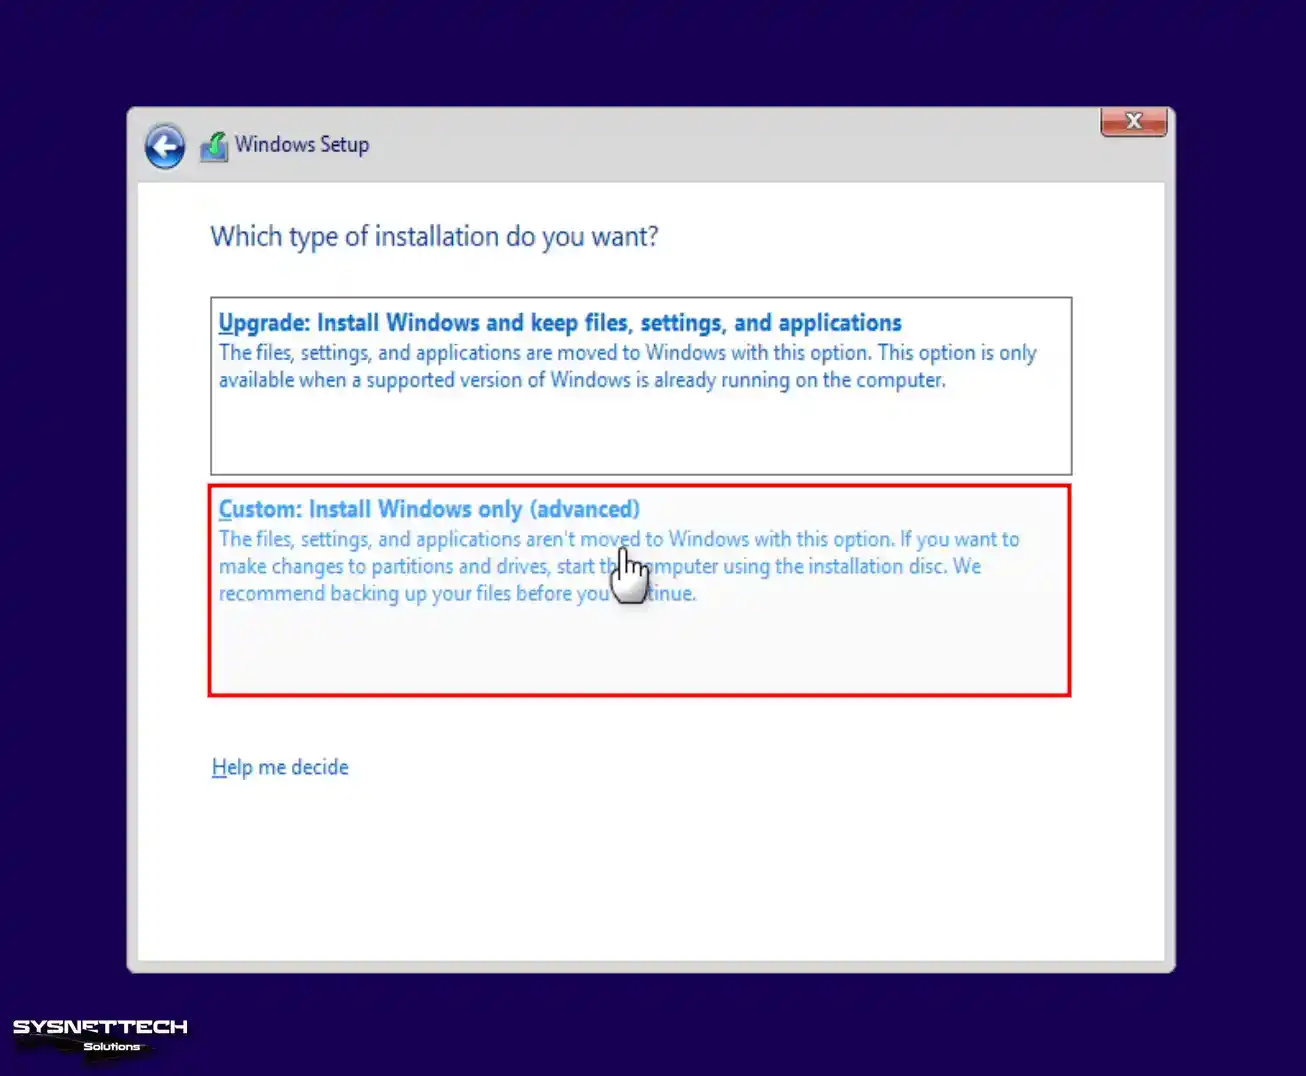
Since you will be installing a system from scratch on the virtual PC, click Install Windows Only in this window.
Step 6
Choose the preferred disk on which you wish to install this OS and move by creating a new partition. You will only see Drive 0 because you have added a disk to your virtual appliance. After clicking the New button to create a new section on Drive 0, click the Apply button to use the disk size automatically set by the system.
When the information window opens, and Windows creates extra spaces on your system, click OK and keep going.

Step 7
Select the partition of the newly created disk drive for Win8 VM.

Step 8
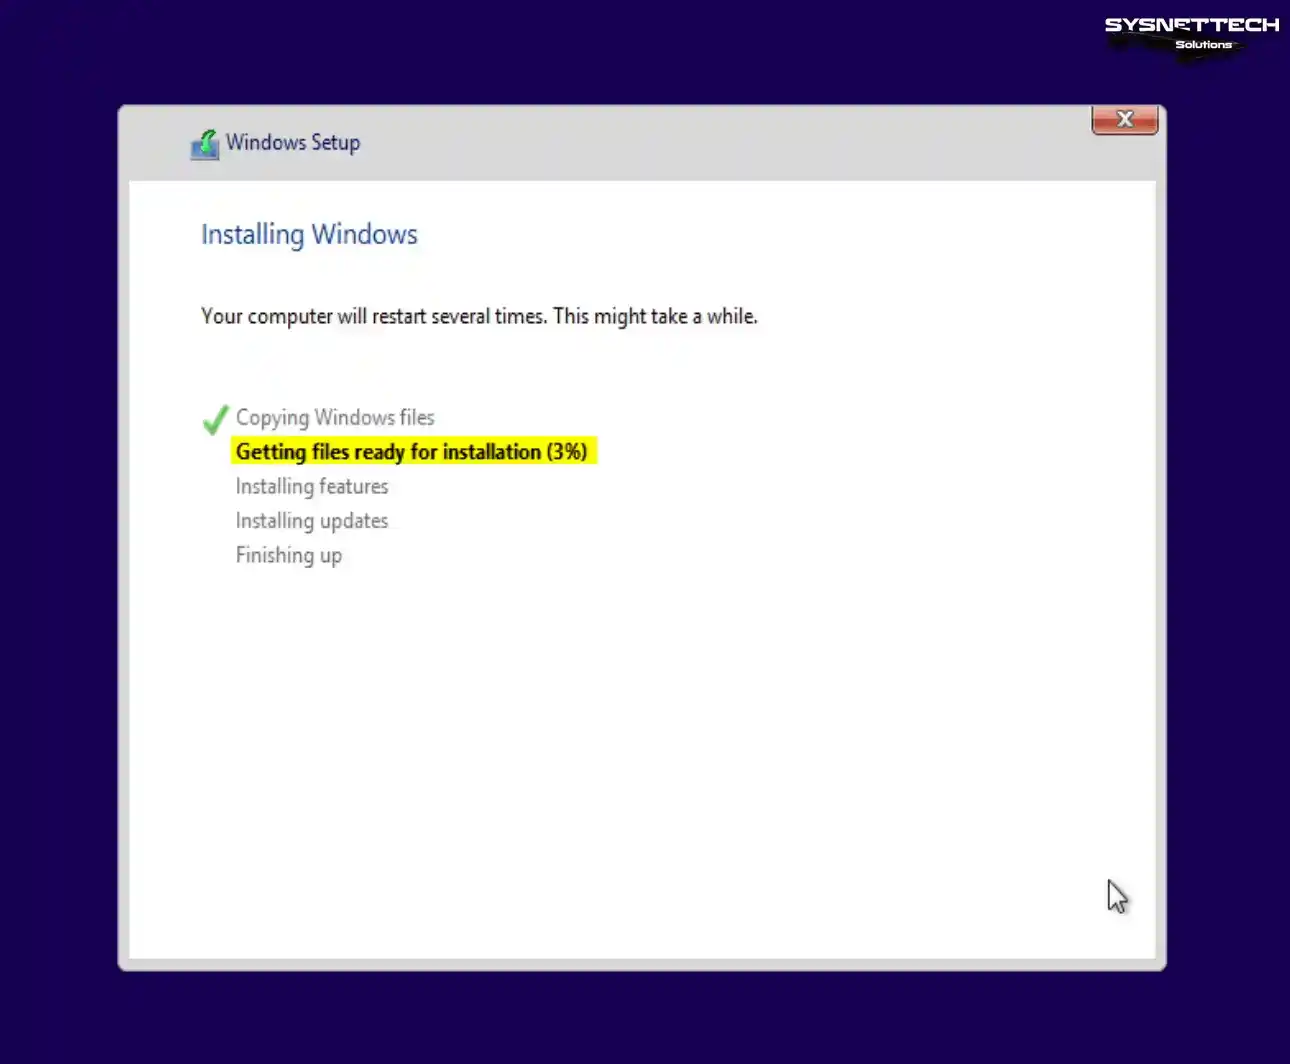
Please be patient as the Microsoft wizard prepares the necessary files for the installation process.
Step 9
Microsoft OS setup wizard will restart your computer when the timer expires.

Step 10
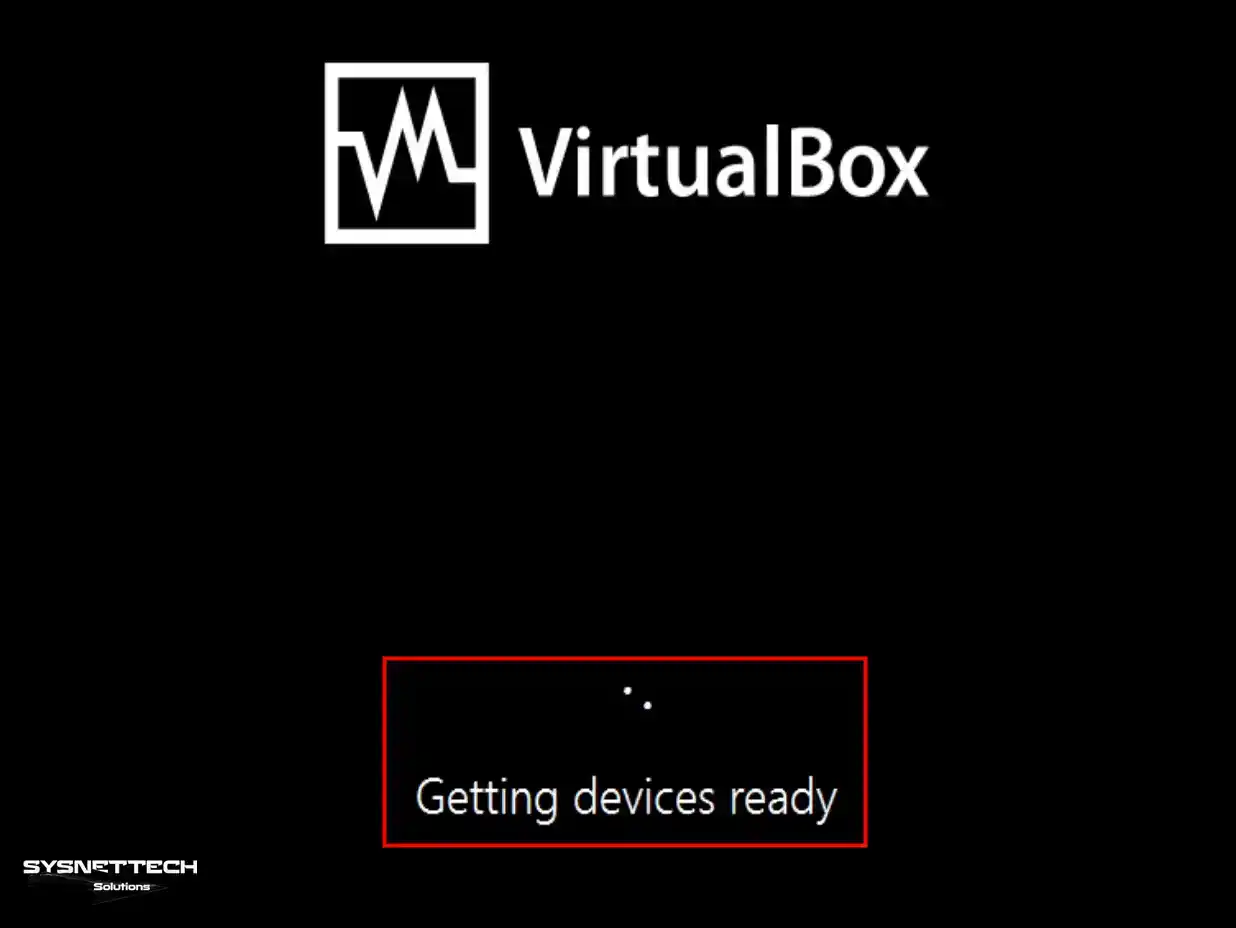
Kindly remain patient as the system proceeds with the device preparation process.
Step 11
You can determine the user interface and theme color of the Win8.1 system on the Personalize screen. In the PC Name field, type a name for your guest computer.

Step 12
For a swift configuration of your virtual system, you may opt to click on the “Use Express Settings” button. As another option, if you select to modify the system’s controls according to your choices, click the “Customize” button to access and adjust the appropriate options.

Step 13
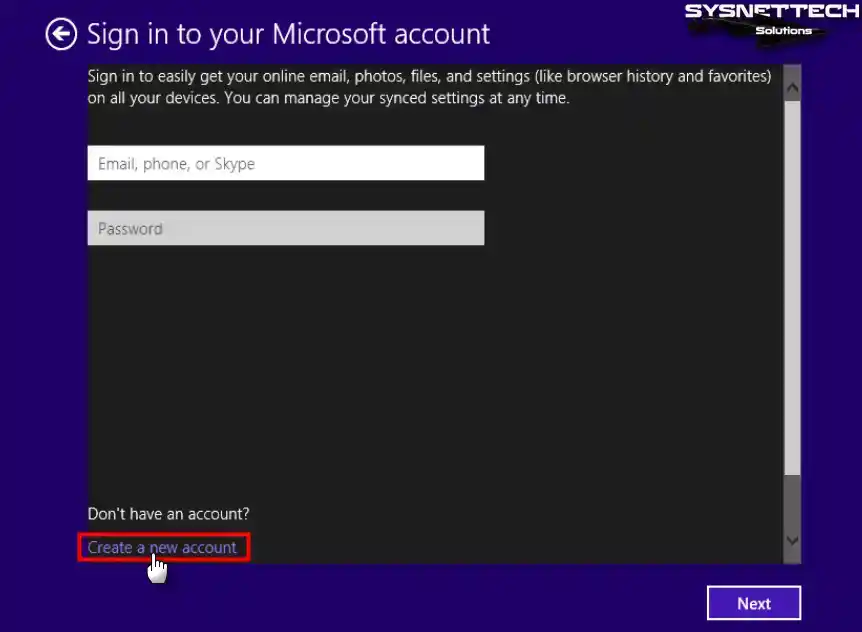
Click Create a new account in the window where the Windows wizard prompts you to sign in with a Microsoft account.
Step 14
On the Microsoft account creation screen, click Sign in without a Microsoft account.

Step 15
Type your username and click the Finish button to continue.

Step 16
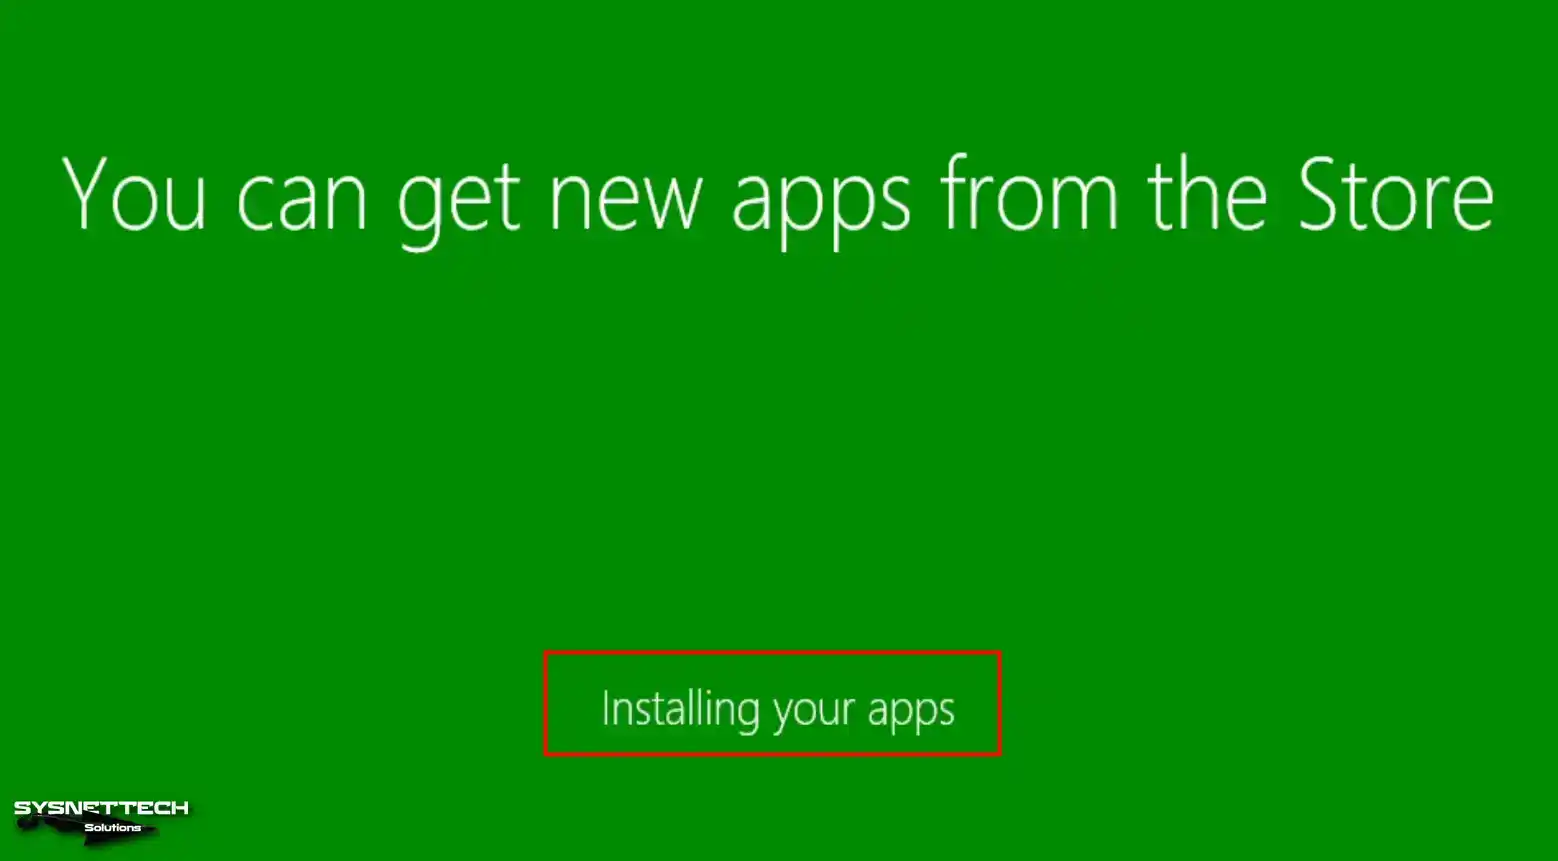
Wait while your system’s store apps are loaded.
Step 17
Upon reaching the desktop screen of your guest system, you can conveniently access and review detailed information about your system. To accomplish this, right-click the “My Computer” symbol inside the start menu and select the “Properties” choice from the following context list.

How to Install Guest Additions in Windows 8 VM
After installing Windows 8 using VirtualBox, the next step is installing the Guest Additions. After the Guest Additions installation, you can use the virtual machine as full screen. Furthermore, you can effortlessly utilize USB 3.0 or 3.1 devices and exchange files with your host computer.
Step 1
First, right-click the start button, and then open Device Manager to see if any drivers are missing.
You will see that the driver for one unknown hardware is not installed, as in the image below, and you will also see that the video card driver of VirtualBox is not installed correctly under Display Adapters.

Step 2
To install the Guest Additions driver package, in the Windows 8.1 VM window, click Devices / Insert Guest Additions CD image.

Step 3
If the system does not automatically recognize the image file, open My Computer and click VBoxWindowsAdditions-amd64.exe in the content of the image file. If you are installing a 32-bit Win8, you should select VBoxWindowsAdditions-x86 here.

Step 4
Continue by clicking the Next button in the Oracle VM VirtualBox Guest Additions installation window.

Step 5
Keep the installation location as the default option and proceed by clicking Next.

Step 6
To install the virtual machine guest add-ons, click the Install button.

Step 7
When the Security window opens, check the Always Trust software from the “Oracle Corporation” option and click the Install button.

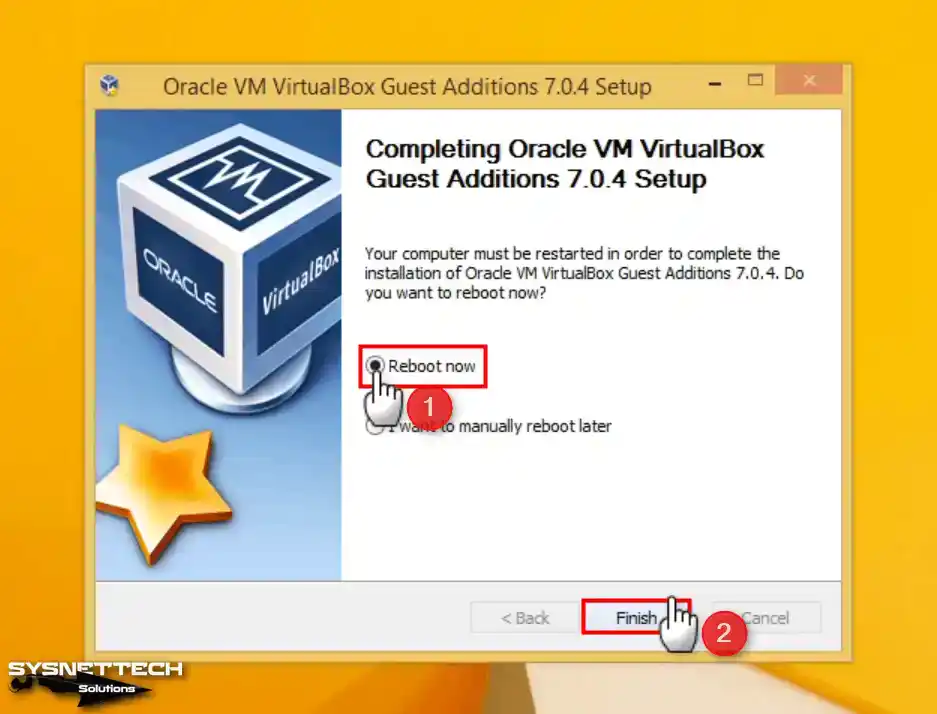
Step 8
To apply the changes, please restart your virtual machine.
Step 9
When your guest system restarts, you will be able to see all drivers installed in Device Manager.

Step 10
After installing your guest machine, you should check that the local network settings are working correctly. By default, NAT is selected for the network adapter type in the VM creation wizard. You can use Bridge mode to get an automatic IP address from your local network’s ADSL modem or Router.
To test your Internet link on your Win8 guest machine, open the CMD command prompt and enter the command “ping 8.8.8.8” to ping the Google servers.
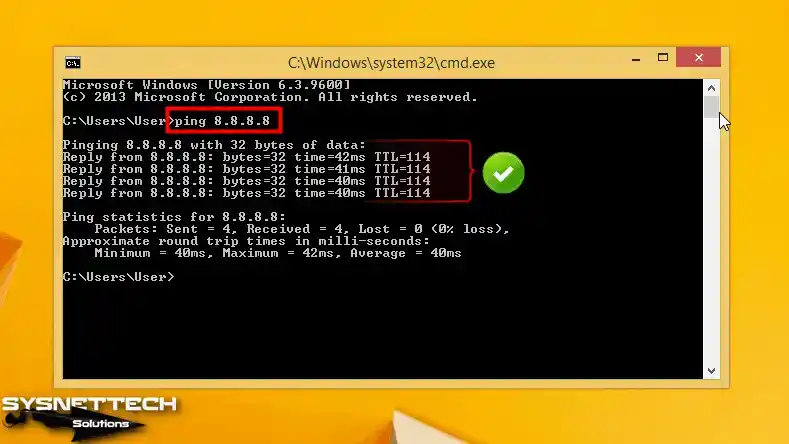
Step 11
If the ping test is successful, visit the Google website via a web browser.

Step 12
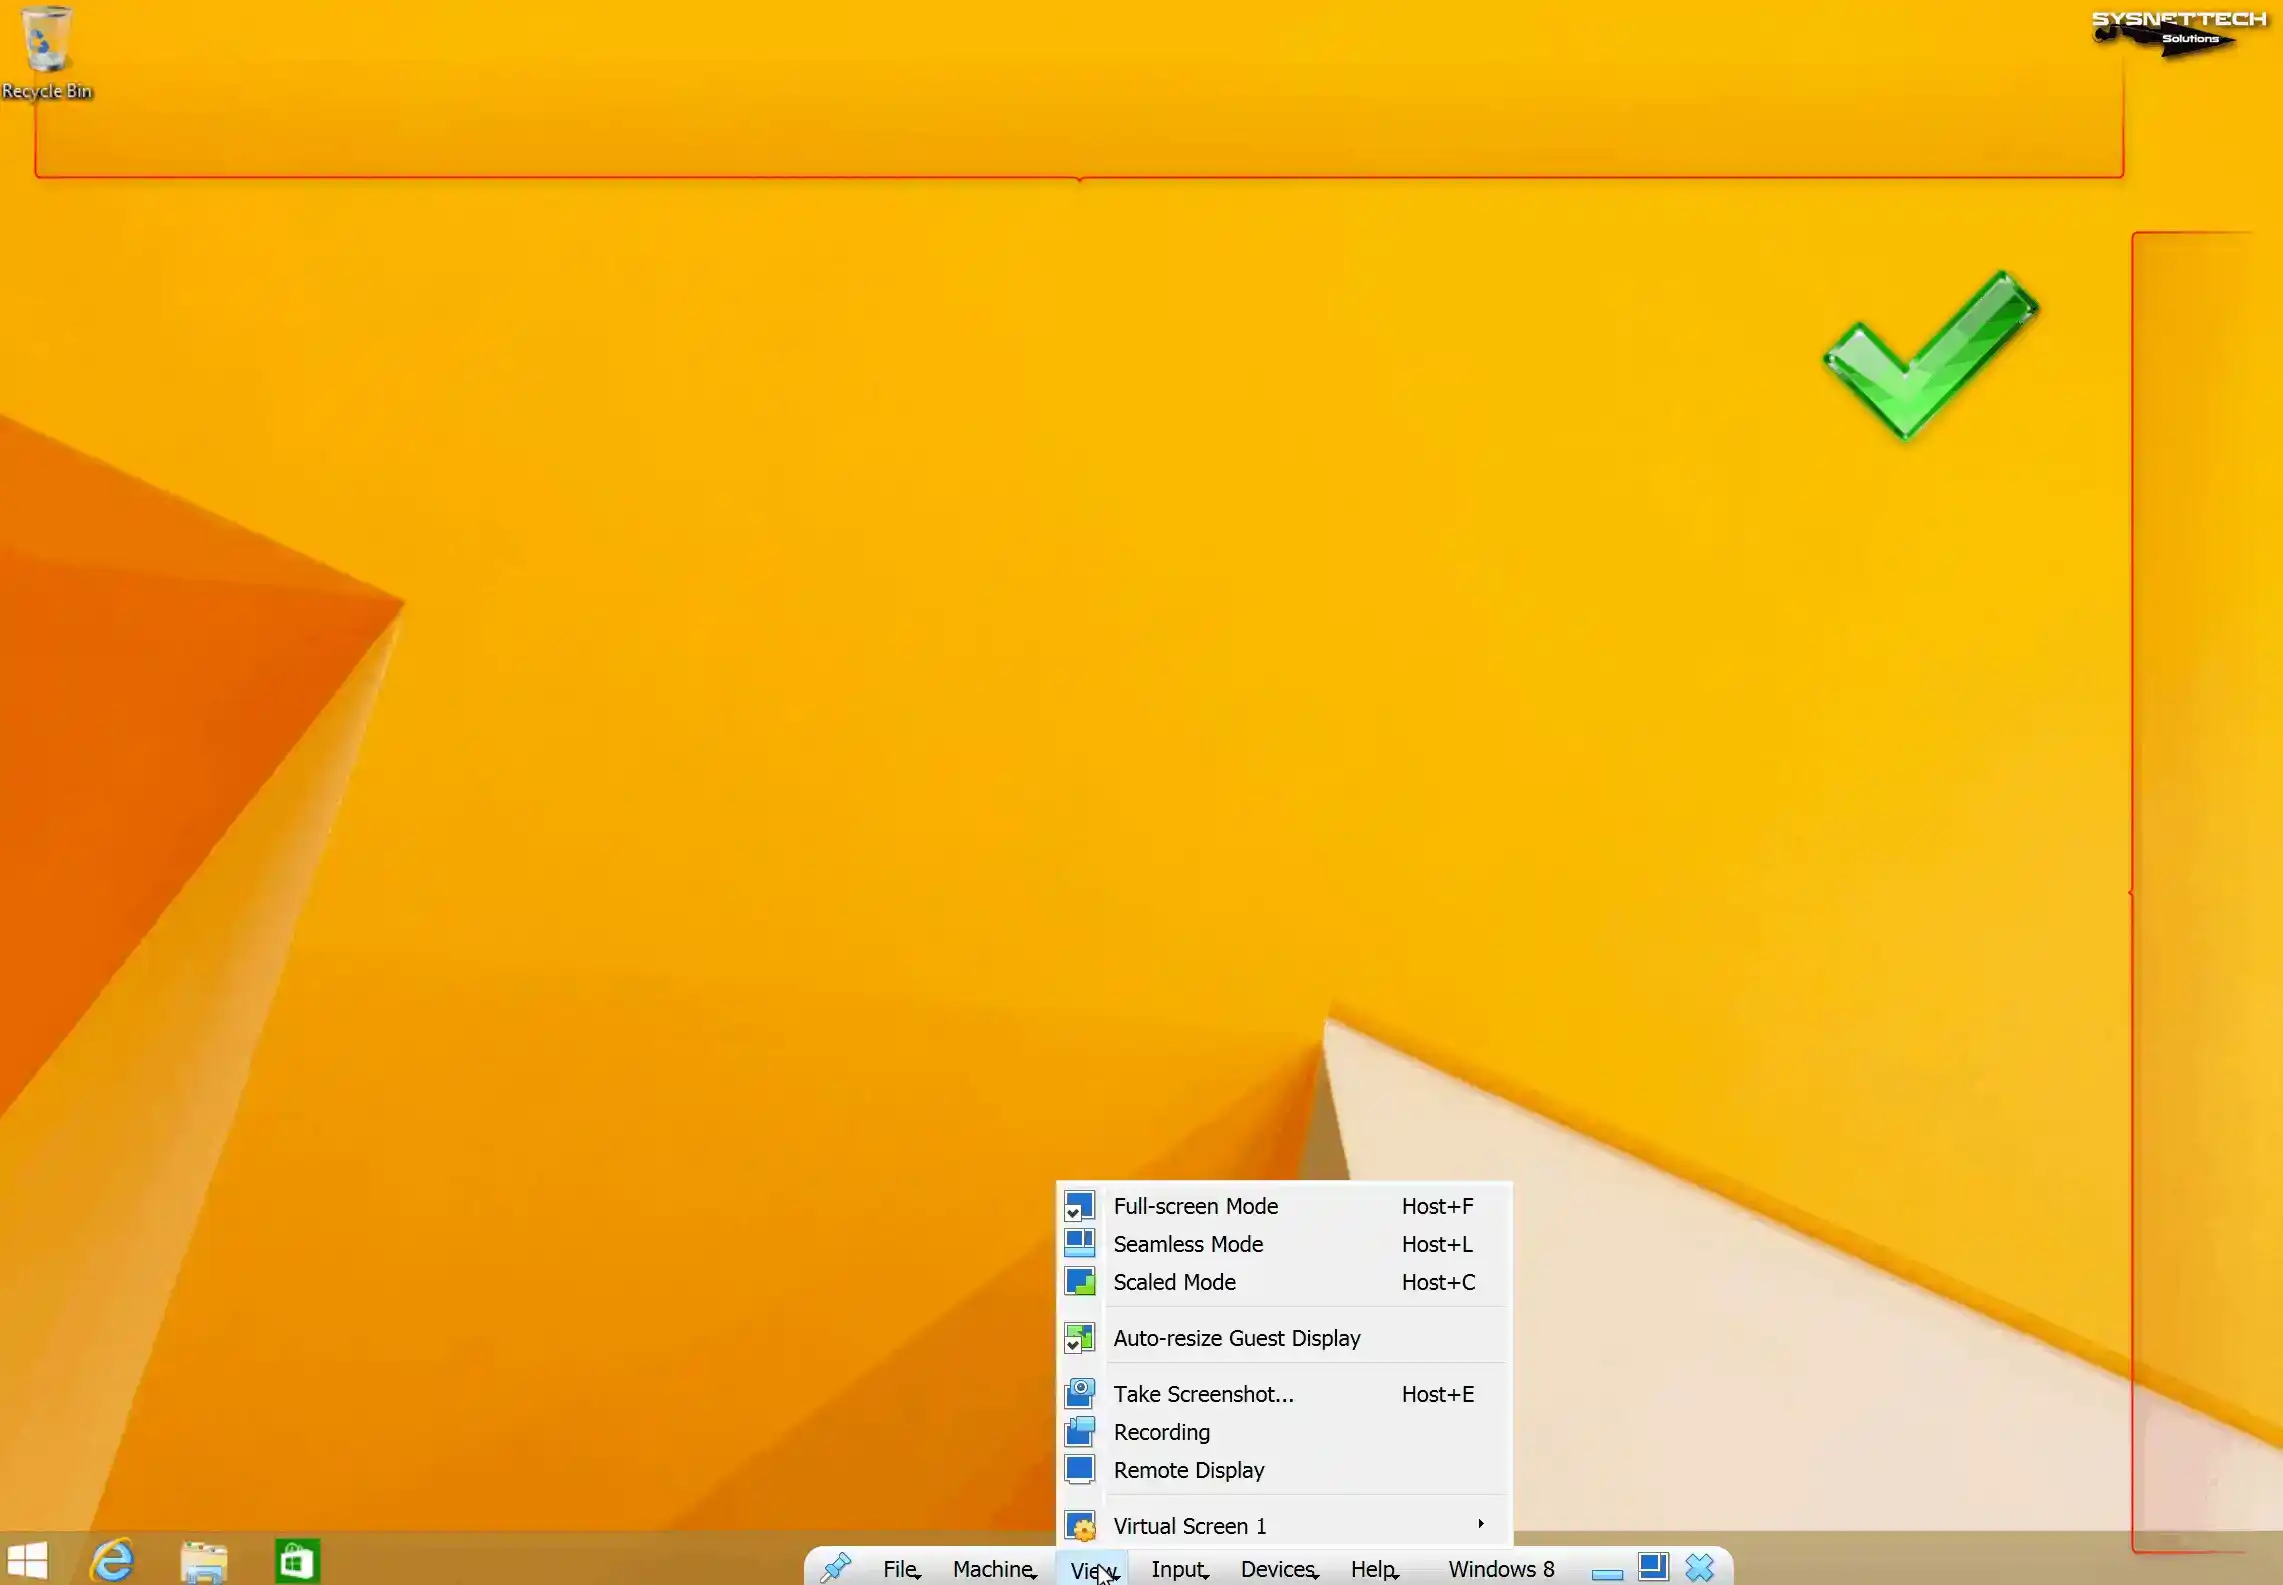
You can click View / Full-Screen Mode from the tool menu to adapt your virtual system to your host’s full-screen resolution.
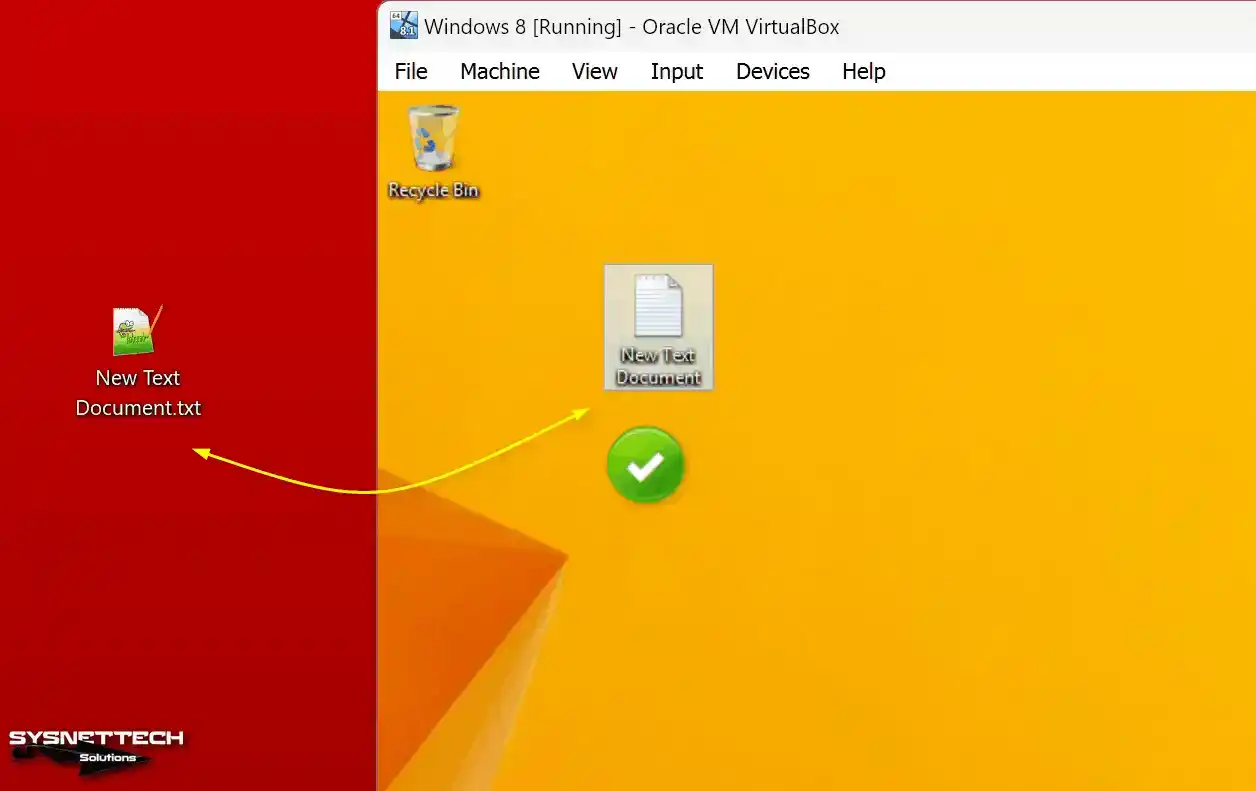
Step 13
You can transfer your files to your VM by drag-and-drop method from your host’s desktop or another location.
How to Configure Shared Folder
You can provide a more straightforward file transfer method with the host by creating a Shared Folder on a Windows 8/8.1 VM.
Step 1
Click Devices / Shared Folders / Shared Folder Settings on the Win8 guest machine.

Step 2
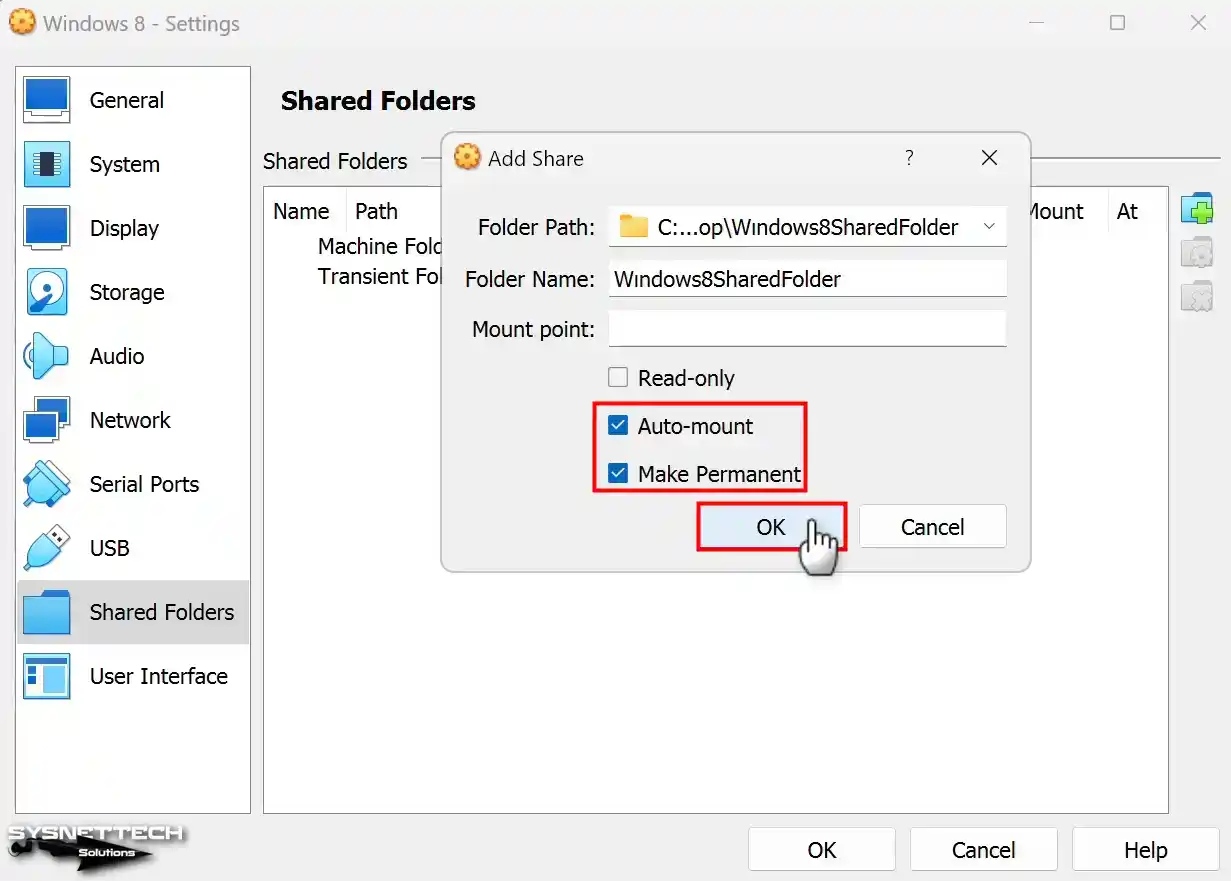
After opening the Shared Folders settings, click the Add button and open the Add Share window. First, create a folder on your host computer that you will use in common with the VM and add the folder’s location in the Folder Path section.

Step 3
Configure the public folder as a network drive in the VM by enabling the Auto-mount and Make-Permanent options.
Step 4
When you view My Computer, you can see that the shared folder has been added to network locations.

Step 5
Likewise, when you click on network and view VBOXSVR content under Computer, you can see Shared Folder.

Step 6
Create any file or document in the folder you specified in the Shared Folder structure and check whether it appears in the shared folder on the host and VM.

How to Use USB Flash Memory
To use a USB stick or a portable storage drive in your VM, you need to enable VirtualBox’s USB hardware.
Step 1
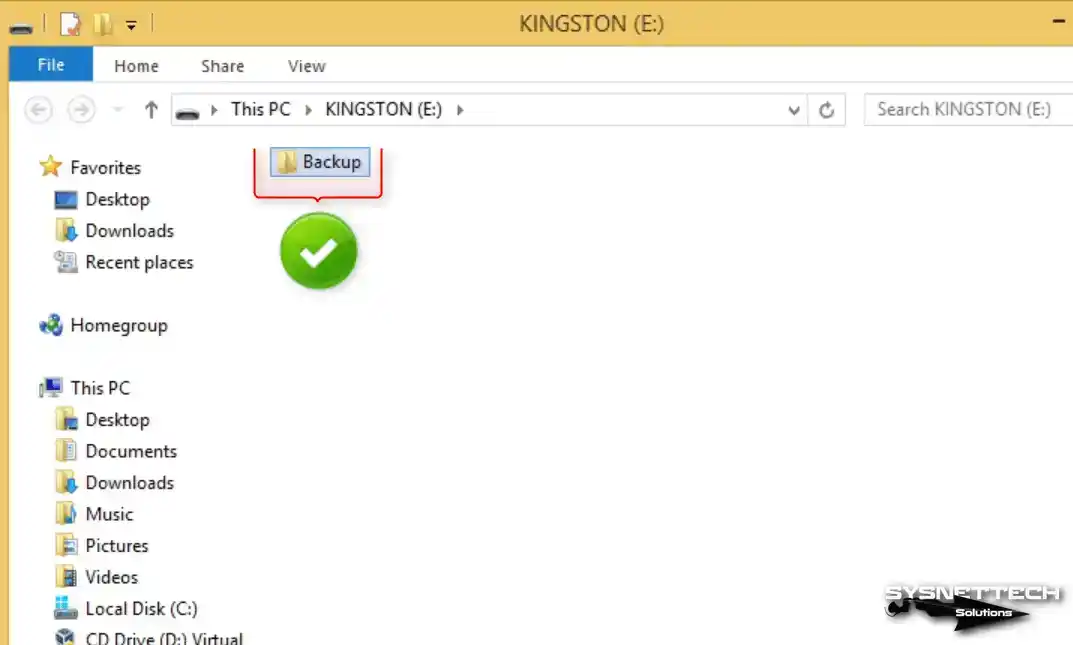
Start by connecting your USB flash device to your host machine. Once connected, navigate to “My Computer” to verify if the device is successfully recognized and listed there.

Step 2
Click Devices / USB / Kingston DataTraveler (Name of Your USB Device) on VirtualBox.

Step 3
The USB memory installed on the host will automatically connect to the virtual computer.
Video
Installing Old Versions
Conclusion
In conclusion, you can install a Windows 8 & 8.1 machine regardless of which version of VirtualBox you use on Windows 11 & 10. Thus, you can start experiencing an old operating system from Microsoft.
In short, you can run such a system virtually without affecting the security of your primary system and with little effect on its performance. Thanks to all these steps that I have provided you, you can easily create your virtual environments. However, whether you want to test Windows 8 or if your goal is nostalgia, Oracle virtualization software provides you with these.

TolgaBagci
Hi, I'm Tolga, a computer expert with 20 years of experience. I help fix computer issues with things like hardware, systems, networks, virtualization, servers, and operating systems. Check out my website for helpful info, and feel free to ask me anything. Keep yourself in the loop about the newest technologies!

It keeps on resetting the setup, like it keeps on saying it will restart, but it just resets it. Please help.
I need a product key, what’s the product key,
I need a product key, the one of my Windows10 product does not work. How may I do ?
Thank you